


Setting up Haptique IR+RF Hub
Complete guide for firmware installation, network configuration, and custom IR remote learning to get your Haptique IR+RF Hub up and running.
Welcome to your Haptique IR+RF Hub setup guide! This tutorial will walk you through the initial firmware installation, network configuration, and custom IR remote learning. You'll learn how to set up your hub and teach it to control any IR device using your existing remote controls.
USB cable, Windows laptop, web browser (Chrome/Edge/Firefox), Haptique Config app, your existing remote controls, and an active internet connection.
Part 1: Initial Firmware Installation
This one-time setup process installs the latest Haptique firmware on your hub. After this, all future updates can be done wirelessly through the Config app.
1 Connect Your Hub to Your Computer
Let's start by establishing a physical connection to your hub.
- Connect the USB cable to your Haptique IR+RF Hub.
- Connect the other end of the USB cable to your Windows laptop or computer.
- Ensure the hub powers on (check for any indicator lights).
2 Access the Firmware Installation Page
Navigate to the Haptique firmware installation portal.
- Open your web browser (Chrome, Edge, or Firefox recommended).
- Navigate to the firmware installation URL:
- Wait for the page to load completely before proceeding.
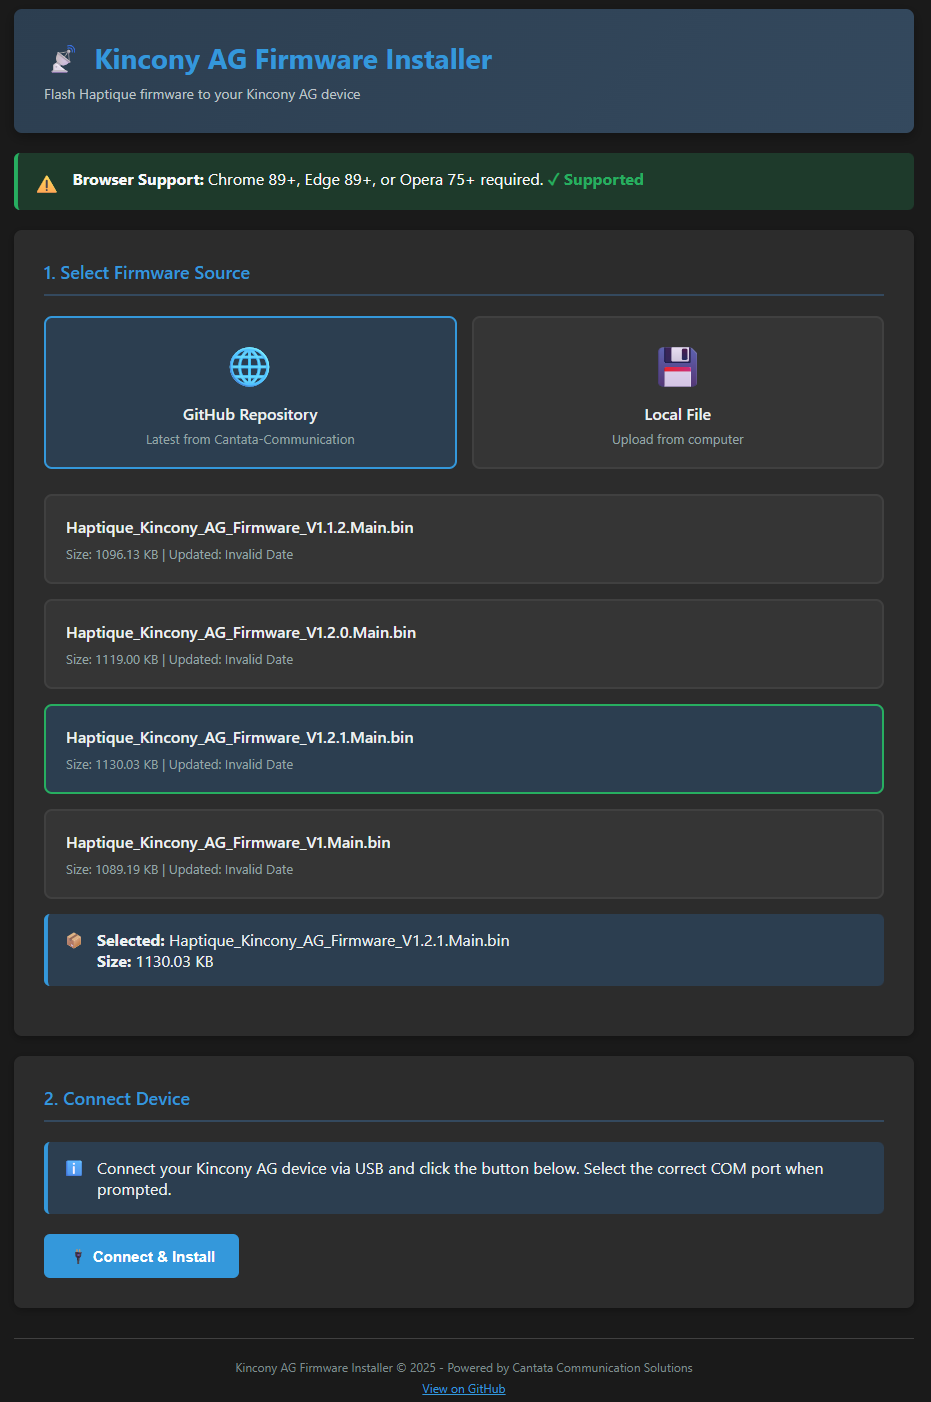
3 Select the Correct Firmware
Choose the appropriate firmware version for your Hub.
- On the firmware installation page, locate the section labeled "Select GitHub Repo".
- From the firmware list, select:
- Scroll down to find the "Connect & Install" button.
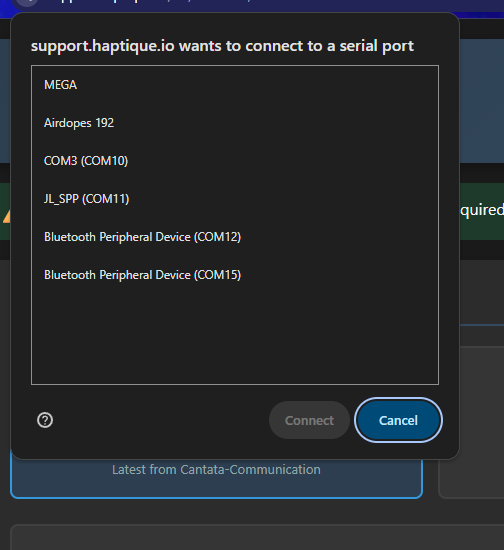
4 Identify Your Device COM Port
You'll need to select the correct COM port for your device.
- Click the "Connect & Install" button.
- A popup window will appear in your browser asking you to select your device's COM port.
If you're unsure which COM port is your device: Unplug the USB cable, then plug it back in. The newly appeared port in the list is your device.
- Select your device's COM port from the list.
5 Install the Firmware
Now let's install the firmware onto your hub.
- Click the button labeled "Install Haptique AG Firmware V1.2.1 Main.bin".
- Click "Next" to begin the installation process.
- Important: Do not disconnect the USB cable during installation.
- Wait for the installation to complete. You'll see a success message when done.
6 Complete the Initial Setup
Your hub is now ready with the latest firmware!
- Once you see "Installation Complete", you can disconnect the USB cable.
- Place your hub in your desired location.
- Power on the hub using its power adapter.
All future firmware updates can be performed wirelessly through the Haptique Config app. You won't need to use USB again.
Part 2: Network Setup with Haptique Config App
Now that your hub has the latest firmware, let's connect it to your network and add it to your Haptique account.
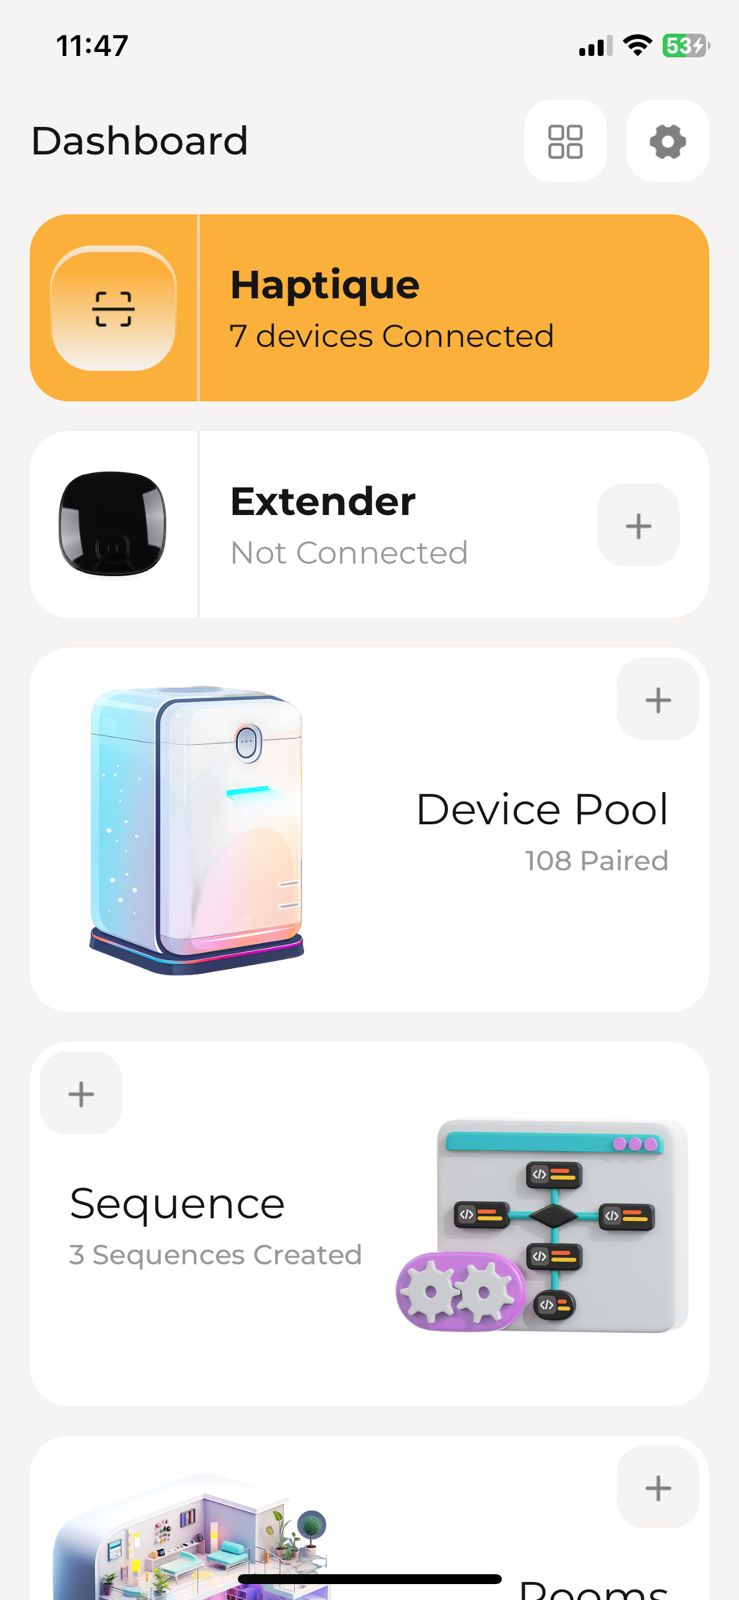
1 Open Haptique Config App
Access your Haptique dashboard to add the new device.
- Open the Haptique Config app on your mobile device.
- Navigate to the Dashboard page.
- Ensure you're connected to the same Wi-Fi network you want the hub to use.
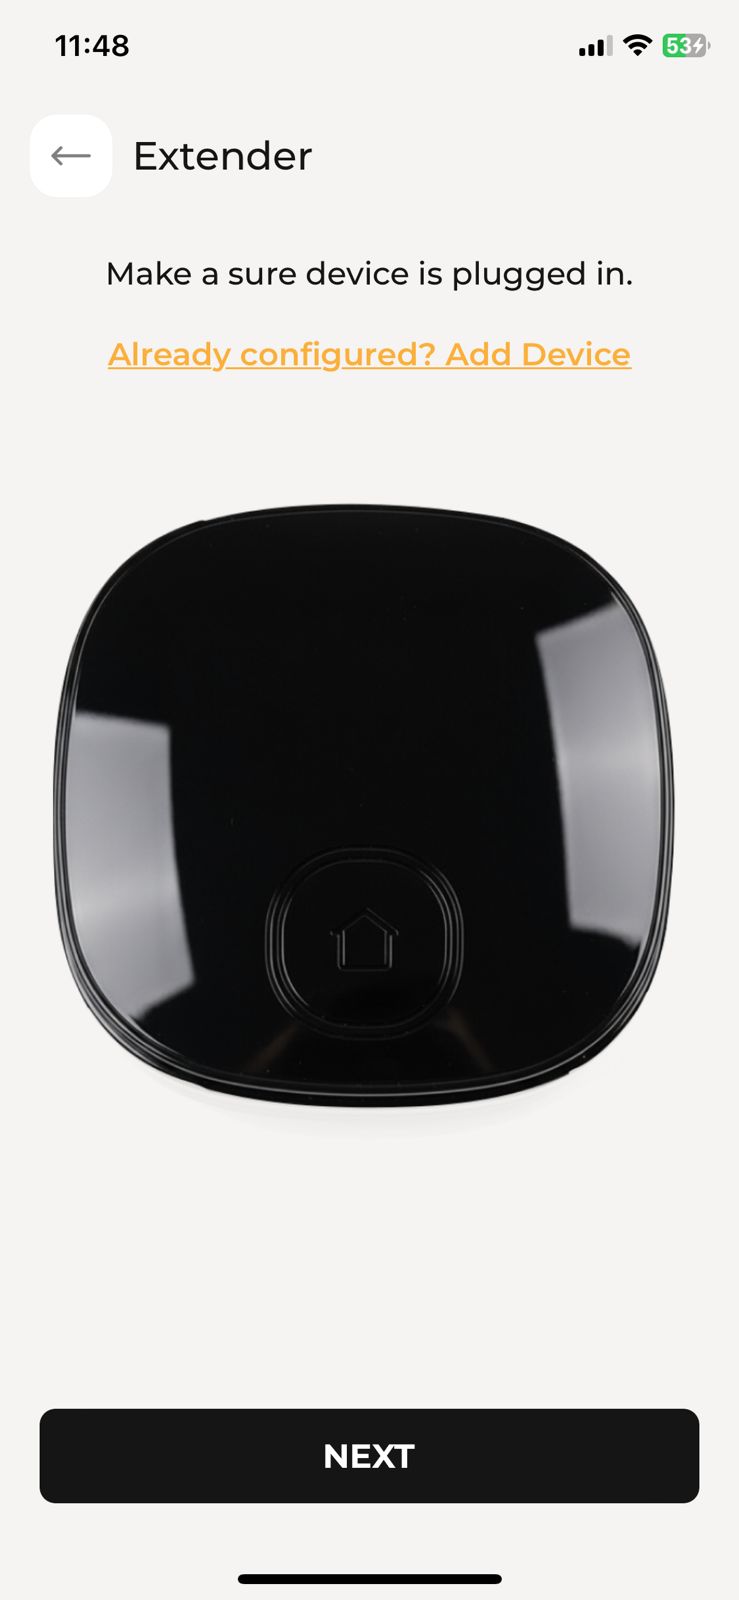
2 Add Your Hub as an Extender
Let's add your hub to your device list.
- On the Dashboard page, locate the "Extender" section.
- Tap the icon in the bottom right corner of the screen.
- Look for and tap the plus (+) icon to add a new device.
- Follow the on-screen instructions to complete the pairing process.
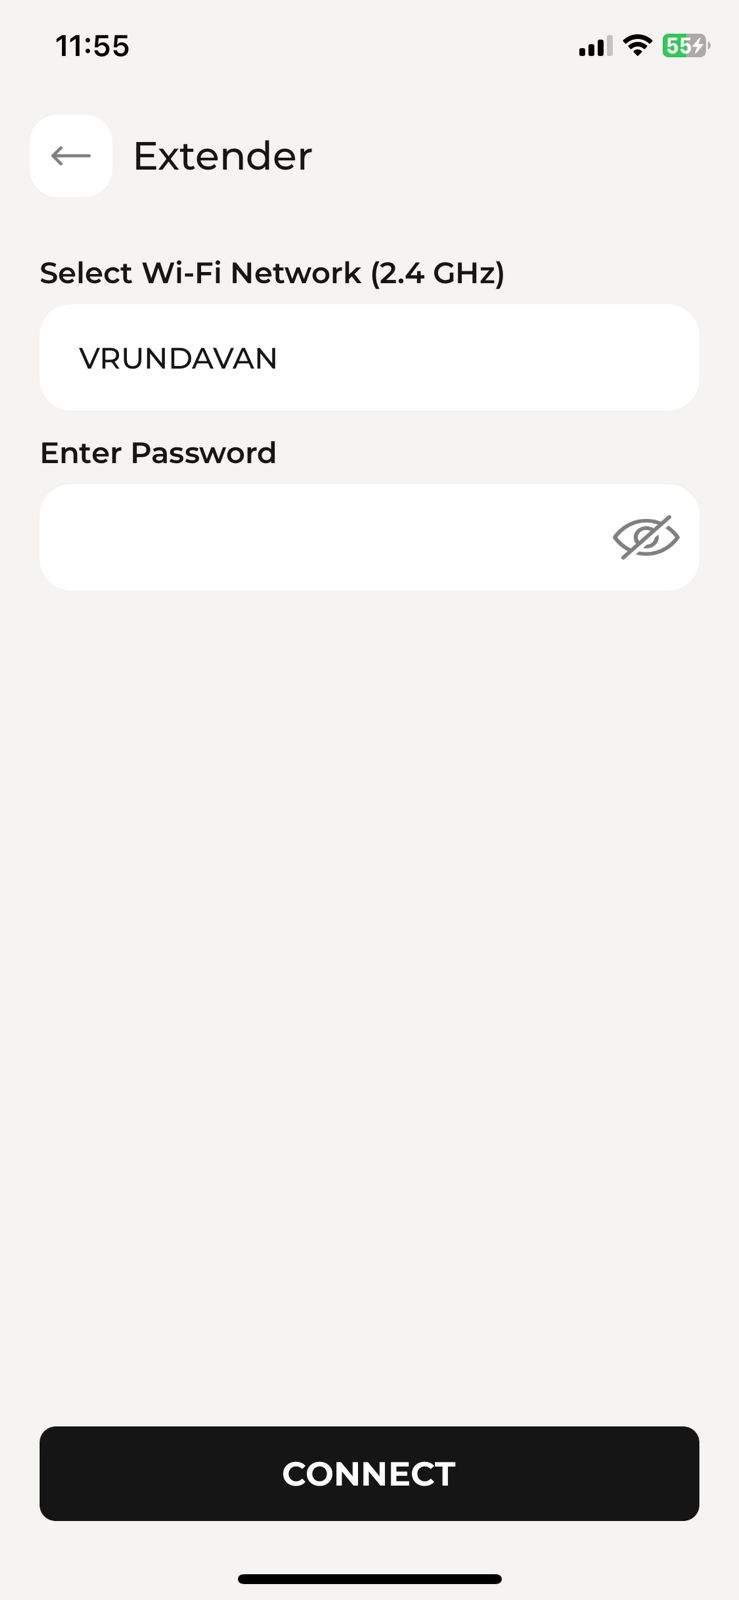
3 Connect to Your Wi-Fi Network
The app will guide you through connecting your hub to your network.
- Follow each step displayed on your screen carefully.
- Select your Wi-Fi network when prompted.
- Enter your Wi-Fi password.
- Wait for the hub to successfully connect to your network.
- Confirm that the device has been added to your account.

4 Link Your IR/RF Devices
Configure which devices will be controlled through this hub.
- In the Extender device settings, locate the "Link IR Device" option.
- Tap on "Link IR Device".
- Select all the devices you want to control through this extender hub.
- Save your selections.

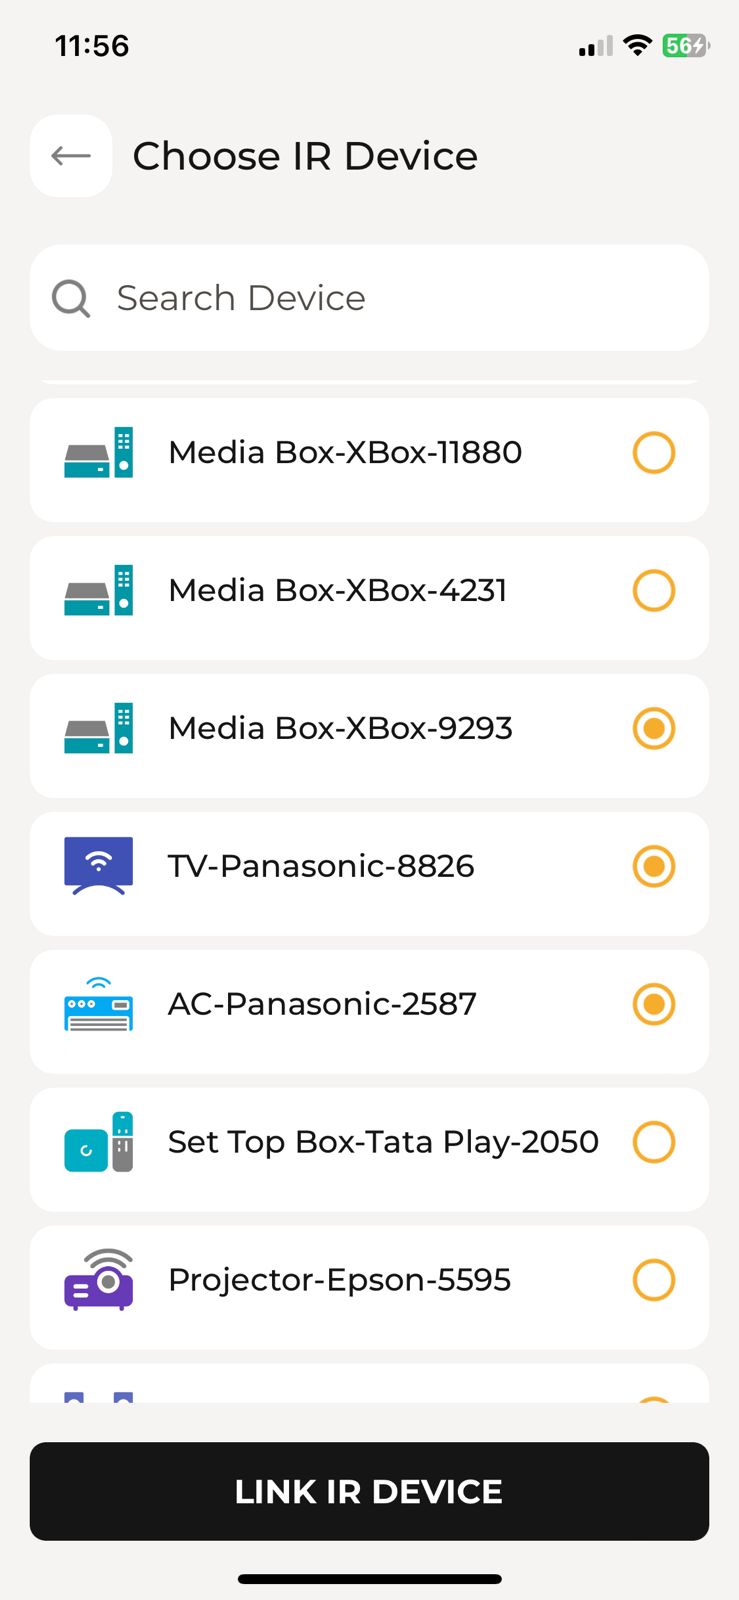
Devices NOT linked: Commands sent via Haptique remote control.
Devices linked to hub: Commands sent through the IR+RF Hub extender.
Your Haptique IR+RF Hub is now fully configured and ready to use. You can start controlling your linked devices through the hub.
Part 3: Custom IR Remote Learning
Learn how to teach your Haptique Hub to control any IR device by learning commands directly from your existing remote controls.
1 Access Device Pool
After your hub is added to your account, let's add a custom IR device.
- Open the Haptique Config app.
- Navigate to Device Pool.
- Click the plus (+) icon to add a new device.
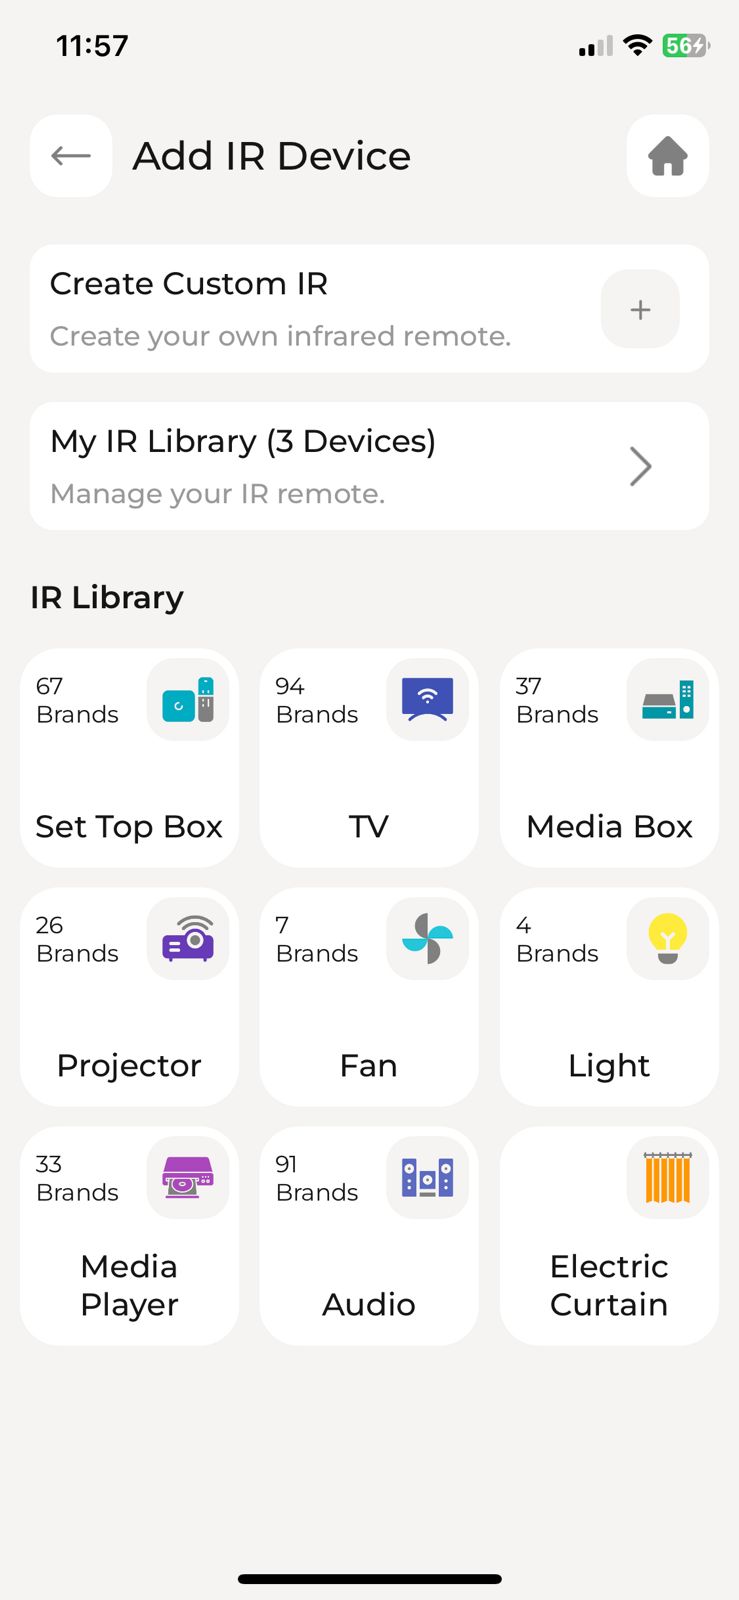
2 Select IR Device Type
Choose the infrared option to begin custom learning.
- In the add device menu, select IR (Infrared) plus icon.
- You will see the option "Create Custom IR" - select it.
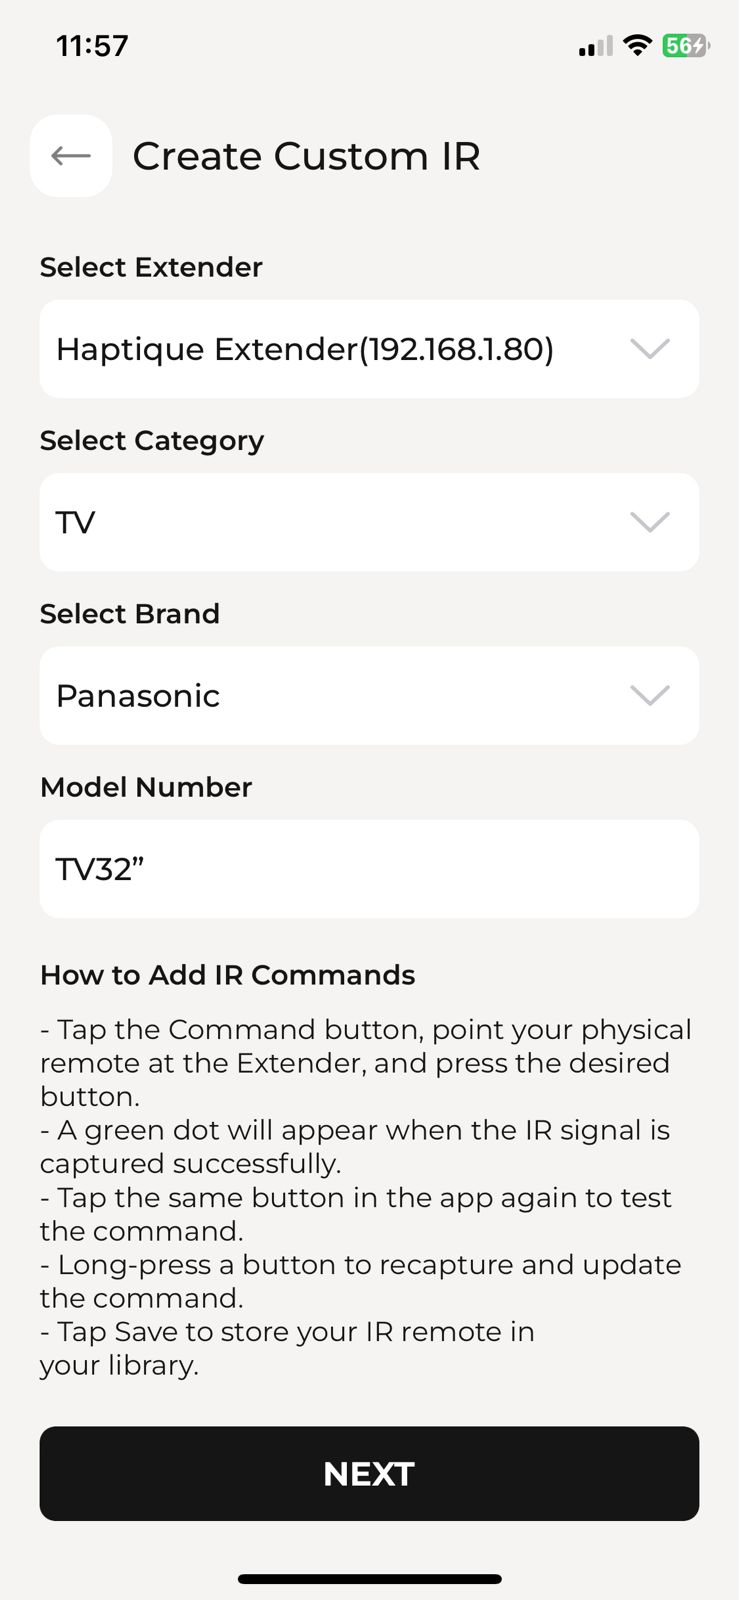
3 Enter Device Information
Provide details about the device you want to control.
- Follow the on-screen prompts to enter your device information:
- Device Type: Select the type (e.g., TV, DVD, Soundbar, Set-Top Box, etc.)
- Brand: Enter or select the brand name
- Model Number: Enter the model number of your device
- Press Next to continue to the learning mode.
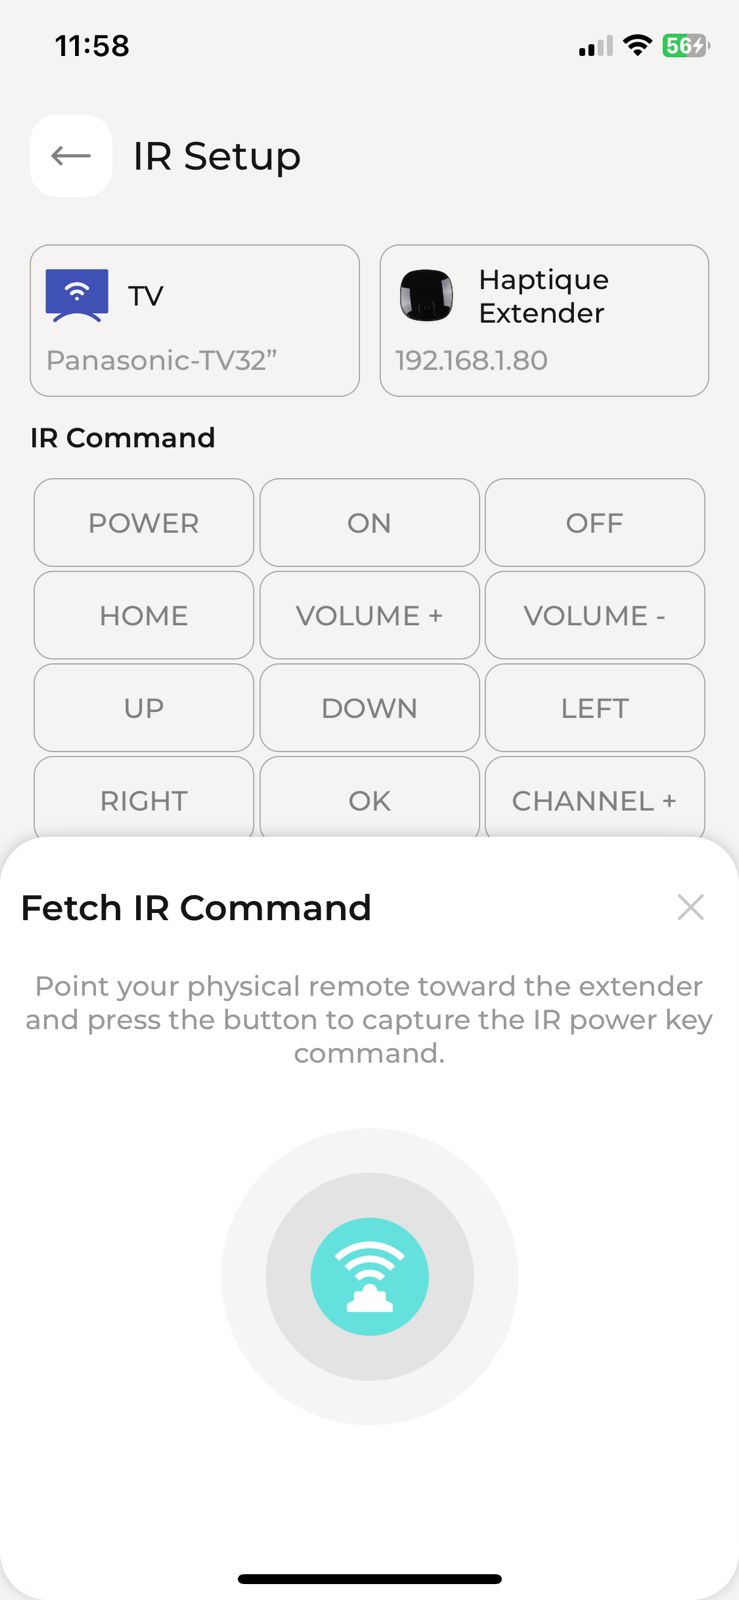
4 Learn IR Commands
Now you'll teach your hub the commands from your original remote.
- First: Press the button in the Config app that you want to program (e.g., Power, Volume Up, etc.).
- Second: Point your actual remote control toward the hub and press the corresponding button.
- The hub will capture the IR signal from your remote.
- You'll see a Green Dot appear on the button in the UI, indicating the command was successfully learned.
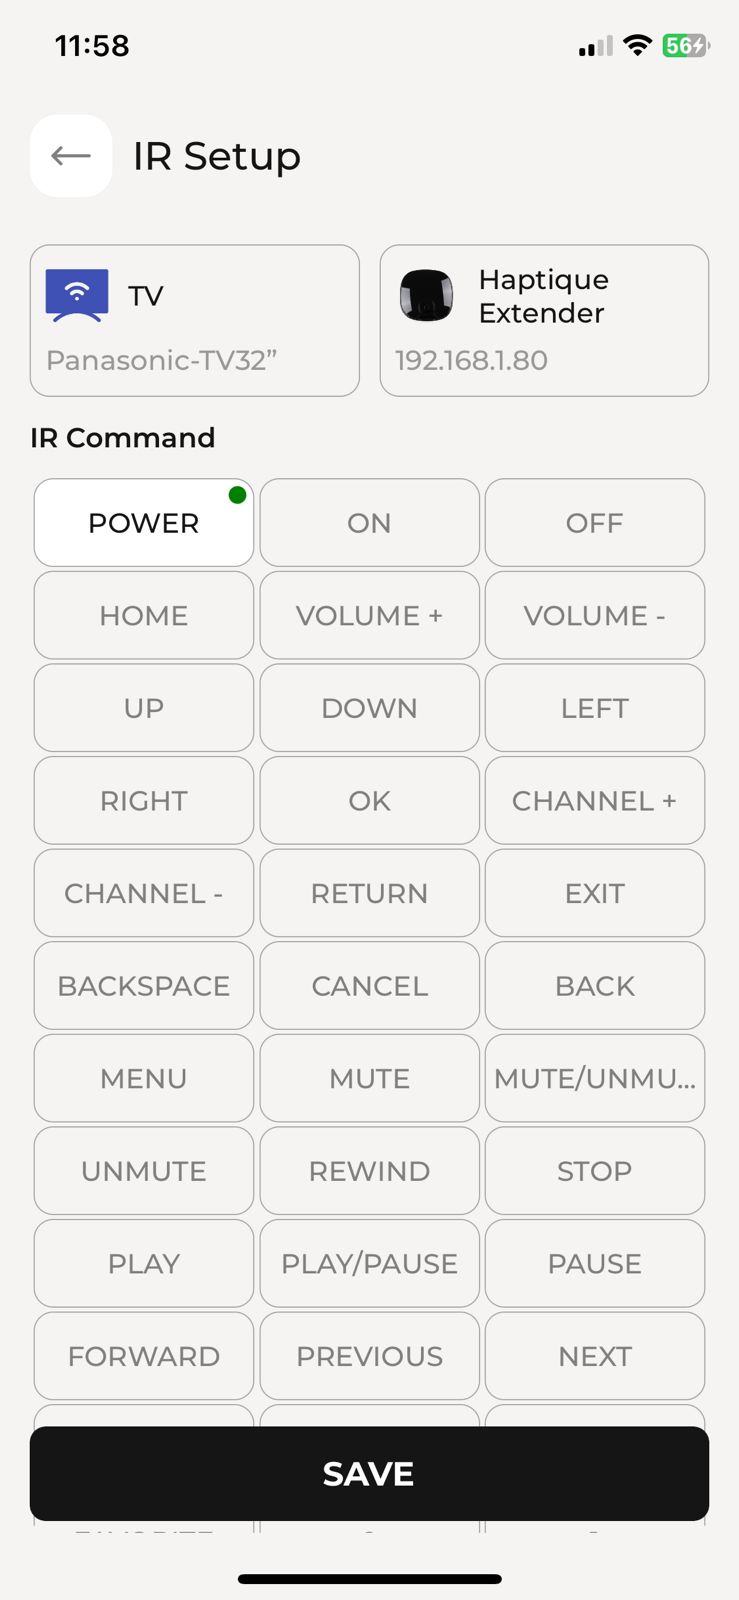
Test command: Press the button again to test your recorded command.
Re-record command: Hold the button to rewrite/re-record the command.
5 Save Your Custom Device
Complete the learning process and save your device.
- After learning all the commands you need, press the Save button.
- Your custom IR device will now be stored in your Device Pool under the IR category.
You can now use this device in your Sequences and room configurations.
Your learned IR device is now available for use in sequences, macros, and can be assigned to rooms just like any other device in your Haptique system.
✓ Using Your Custom IR Device
Your newly created device can now be used throughout your Haptique system:
- Assign it to specific rooms for organized control.
- Include it in sequences for automated routines.
- Create macros that combine multiple device commands.
- Control it directly through the Haptique remote interface.
Troubleshooting
? Can't Find COM Port
- Try a different USB cable (some cables are charge-only and don't support data transfer).
- Try different USB ports on your computer.
- Restart your computer and try again.
- Check if device drivers need to be installed.
? Firmware Installation Failed
- Ensure the USB cable is securely connected.
- Try using a different web browser (Chrome is recommended).
- Disconnect and reconnect the device, then try again.
- Check that you selected the correct firmware file.
? Hub Not Appearing in Config App
- Ensure the hub is powered on and within Wi-Fi range.
- Verify your phone is connected to the same network.
- Try restarting the hub by unplugging and replugging it.
- Make sure you've completed the firmware installation successfully.
- Check if your router's firewall is blocking the device.
? Devices Not Responding to Commands
- Check that devices are properly linked to the hub in the Config app.
- Verify the hub is positioned within IR/RF range of your devices.
- Ensure there are no obstructions blocking the IR signal path.
- Test with devices at different distances to find optimal positioning.
? IR Learning Not Working
- Ensure you're pointing the original remote directly at the hub during learning.
- Hold the remote 2-6 inches away from the hub's IR receiver.
- Make sure there's no bright light interfering with the IR sensor.
- Press and hold the remote button for 1-2 seconds during learning.
- If a command fails to learn, try re-recording it by holding the button in the app.
? Learned Commands Not Working
- Test the command immediately after learning using the test function.
- Ensure your device is powered on and within range of the hub.
- Check that the hub has a clear line of sight to the controlled device.
- Try re-learning the command if it's not working reliably.
- Verify the original remote has fresh batteries during the learning process.
? Factory Reset
- Problem: Your hub is not functioning correctly and standard troubleshooting steps haven't resolved the issue.
- Solution: Press the reset button on the back of the device 7 times using a pin or paperclip.
- Step 1: Locate the small reset button on the back side of your hub.
- Step 2: Get a pin, paperclip, or similar small pointed object.
- Step 3: Press and release the reset button, wait 2 seconds.
- Step 4: Repeat the press and release action 6 more times (7 times total).
- Pattern: Press → Release → Wait 2 sec (repeat 7 times).
- Result: All custom IR devices, Wi-Fi settings, and account information will be erased.
- Warning: Only perform factory reset as a last resort. You will need to set up your hub again from scratch.
- After Reset: Return to Config app and add as new extender.
Visit https://support.haptique.io for additional resources, or contact Haptique customer support for technical assistance.

