Overview
Unlock the Full Potential of Your Haptique® Controller with Haptique® Config App.
Configure all devices in a single app. The Haptique® Config app allows you to easily manage your entire device pool, including all types of devices and hubs, from a single intuitive app.
Create and manage sequences. Build custom sequences tailored to your specific needs or follow step-by-step guides to create predefined sequences.
Haptic Key Mapping for Precise Control. Map keys to physical buttons on your Haptique® controller for a tactile and intuitive user experience.
Curate and personalize the rooms. The Haptique® Config gives you full control to personalize the Haptique® controller screens using the rooms, Choose which devices and sequences appear on each room screen.
Manage your account and Haptique® controllers. Connect and unlink multiple Haptique® controllers to your account, ensuring your devices, rooms, and sequences are always accessible and secure.
Prerequisites
To set up the Haptique Remote, ensure you have the following:
1. WiFi Network
Have your network name (SSID) and password ready.
The Haptique Remote, devices to be controlled, and the mobile device with the Haptique app must all be on the same WiFi network.
2. Mobile Device
A smartphone or tablet connected to your WiFi network.
3. Haptique App
Download the Haptique app from your mobile device's app store. You’ll use this app to set up and configure the Haptique Remote.
4. Haptique Account
If you don’t have a Haptique account, you’ll create one during the setup process. The account allows you to manage devices, configurations, and future updates.
Next Steps
Once you’ve gathered these items, follow the ‘First Time Setup’ instructions below to complete the integration. Make sure all devices are properly connected to the same network for a smooth experience.
First Time Setup
You have received your brand new Haptique® RS90 and want to get it up and running, no worries. There are just a few simple steps you need to follow to get the best out of Haptique® RS90.
Download the Haptique® Config App
Get the app from the Google Play Store or Apple App Store on your smartphone
Register
After installation of the Haptique® Config app, Open the app and tap on the “Register” link to sign up for a Haptique® account. Fill up your personal information or simply join using your google, facebook or apple account.
Link your Haptique® Controller
Once you've created your Haptique® account, the Config app will take you to the home screen. You'll see a message indicating that no Haptique® controller is currently connected.
Tap on "Haptique® Not Connected" to open the camera and scan the QR code on your new Haptique® controller to link it.
Power on your Haptique® remote for the first time and connect Haptique® Controller with your local WiFi network. Haptique® RS90 supports a 2.4 GHz network. The Haptique controller display will show a QR code.
Scan QR code displayed on Haptique® controller using the Haptique® config app.
Once scanned, your Haptique® remote will show a security code that needs to be entered in the Config app prompt.
Congratulations, your Haptique® remote is now connected to your account and ready to use.
The home screen
The intuitive layout of the Config app allows you to easily add new devices, create sequences, and customize rooms for your Haptique® remote.
1 | Haptique® Connect |
Link your Haptique® remote with your Cantata account. |
2 |
Device Pool |
|
3 | Sequence |
|
4 | Rooms |
|
5 | Settings |
|
6 | Add New | Add new corresponding device, sequence or room. |
Device Pool
The Haptique® Config app allows you to easily manage your entire device pool, including all types of devices and hubs.
1 | Search Device | Enter device name to search particular device |
2 |
Device List |
List of device added by you in device pool
|
3 | Filter By Source |
You can filter and view only a list of added devices of specific source like Infrared, HA, Hue etc.
|
4 | Delete |
Delete specific devices.
|
5 | Quick access button: Rooms |
A shortcut button to go directly to the room's screen.
|
6 | Quick access button : Sequence | A shortcut button to go directly to the sequence screen. |
7 | Add Device | Add a new device from a different source. |
Add Device
On the device pool screen, tap the (+) Add Device button. This will take you to the Add Device screen, where you'll see a list of supported integrations.
Let’s add an Infrared device first, tap the icon next to "IR (Infrared)" in the list.
1 | Integration Category | List of integration category that contains added device |
2 |
Device Category |
List of device category with count of device added in that category
|
3 | Add New Device | Add new device of that particular integration category
|
4 | Device Exist Indicator |
This indicates whether devices exist or not in a particular integration category. |
A list of different IR categories will be displayed, here choose the device category of which device you need to add. For instance, let's add an AC device.
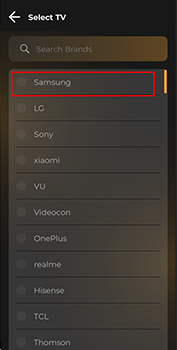
A list of AC brands will be presented to you, Haptique® supports over 6200+ brands. In our case, it’s the Samsung AC that we want to add. Choose the Samsung brand to move forward.
If you have multiple Haptique® controllers linked to your account, you'll be prompted to select the Haptique® controller from which you want to send test IR codes to identify a compatible remote.
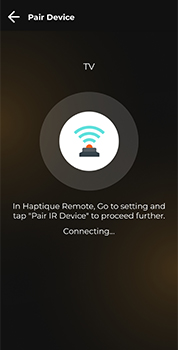
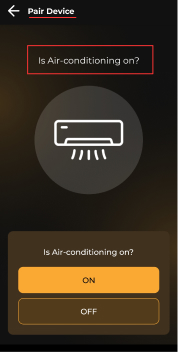
Now, it's time to pair the selected brand's device with your actual device. To do this, we'll first establish a real-time connection between your Haptique® Config app and Haptique® controller. This will allow you to send IR codes from the remote to see which IR remote works with your specific AC device.
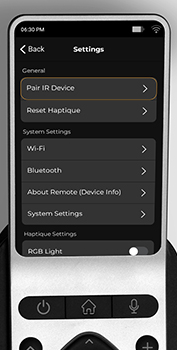
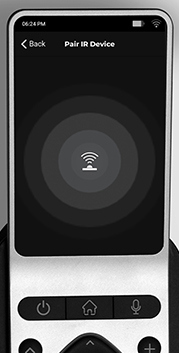
To establish a real-time connection between your Haptique® controller and the Config app, go to the Settings
page on your chosen Haptique® controller and tap on "Pair IR Device." This will open a connection screen
that will link to your Haptique® Config app. Keep the both connection screens open in the controller and
config app to establish uninterrupted connection.
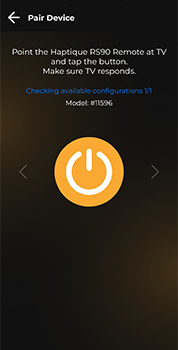
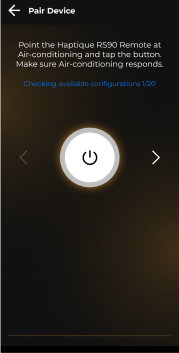
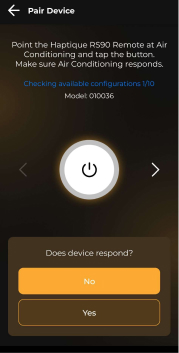
Once connected, the Config app will redirect you to an IR remote selection screen. Point your Haptique®
controller towards your device and trigger IR commands from the list to see if your device responds. If it
doesn't, tap the next configuration arrow to load the next remote's IR set from our database. Repeat this
process until your device responds to one of the remote IR sets. Once your device responds, tap the "Save"
button to store the device with its configuration.
Hooray! You've successfully added your first device. The newly added device can be found in the "Device Pool" screen. You can update the device name from there and make it available on your Haptique® controller by adding it to the rooms. We'll guide you through that process later.
Sequence
A sequence is a powerful tool that allows you to create a series of commands from different devices. These commands are executed sequentially, performing a predefined task or repetitive configuration with a single click. Additionally, Haptique® offers customizable delays between commands and key mapping for each sequence, enabling seamless device control even after the sequence has been executed.
1 | List | List of sequence with name and icon |
2 | Delete | Delete specific sequence. |
3 | Edit Sequence |
This will open a prompt box that allows you to change the sequence name.
|
4 | Quick access button: Rooms | A shortcut button to go directly to the room's screen.
|
5 | Quick access button : Device Pool |
A shortcut button to go directly to the device pool screen. |
6 | Add Sequence | Add a new custom or predefined sequence. |
Add Sequence: Custom
On the Sequence screen, tap the (+) Add Sequence button. This will navigate you to the Add Sequence screen, where you will be presented with two options:
Custom Sequence: Create a sequence from scratch by selecting each command and device manually.
Predefined Sequence : Follow a step-by-step selection process to generate a sequence automatically based on your inputs.
Tap on ‘custom’ sequence type, This will a create sequence screen that will have below elements:
1 | Search Device | Enter the name of device from which you want to choose commands |
2 | Device List | Shows list of device added to your accounts |
3 | Command List |
Shows list of commands of selected device
|
4 | Save | Save the sequence configuration |
5 | Add Command |
Add this particular command to sequence
|
6 | Selected commands |
It shows list of commands selected for sequence
|
Choose commands from the available devices to add them to the sequence. Selected commands will be
highlighted, and you can tap them again to deselect. All selected commands will appear in the bottom
container; tap on the container to view the selected commands in full-screen mode.
You can add a custom delay between selected commands. To set a custom delay, tap on the clock icon. This
will display an increment and decrement UI within the command cell, allowing you to set the delay time
in seconds. Note that the delay indicates the time to wait after executing the command, not before.
You can also reorder commands to adjust their execution order in the sequence. To reorder, tap and hold the hand icon on the left side, then drag the command up or down to reposition it.
After adding all the commands, tap the save button to complete the sequence.
Add Sequence: Predefined
The Haptique® configuration app includes a set of predefined activities designed to guide you through setting up a specific activity.
Currently, there are two predefined activities in the sequence: Watch TV and Watch Movies. Additional activities will be added in the future.
These activities guide you step-by-step to make selections, based on which a sequence of commands is prepared. The app also automatically maps keys to your Haptique® controller’s keypad, enabling seamless control. More about key mapping in the next chapter.
Watch TV Activity
Let’s add a Watch TV sequence to better understand how it works. On the Sequence Type selection screen, tap on ‘Watch TV’ to create a new Watch TV activity.
This will initiate a series of step-by-step questionnaire screens where you’ll need to provide your desired answers. The steps are as follows:
Device Selection Screen
The Watch TV sequence will first prompt you to select the devices to include in the sequence. You’ll be asked to choose from the following three types of devices:
Source Device: The device that serves as the input for your media, such as a set-top box or DVD player.
Audio Device: The device that produces sound, such as speakers or an AVR.
Display Device: The device that outputs the media, such as a TV or projector.
Input Selection Screen
In the next step, you will be asked to select the device whose input needs to be configured. Choose the desired option from the list and tap the Next button to proceed.
Change Channels Screen
In this step, select the device that will be used to change channels. Based on your selection, the channel keys will be mapped to the Haptique® controller’s keypad.
Control Volume Screen
In this step, select the device that will be used to adjust volume. Based on your selection, the volume keys will be mapped to the Haptique® controller’s keypad.
At the final step, the Haptique® configuration app will prompt you to confirm the creation of the sequence. Tap the Done button to finalize the setup and proceed to the Sequence Details screen, where you can view all the commands generated based on your selections.
Even after creating a sequence from a predefined activity, you retain full control over it. You can modify the commands and adjust the automatically mapped keys to suit your preferences, then save your changes.
Key Mapping
Key mapping is a powerful feature that gives you complete control over your Haptique® controller’s keypad. The tactile feedback when controlling smart home devices is what sets the Haptique® controller apart, and the Haptique® config app ensures you can personalize this experience to suit your preferences.
With this feature, you can assign specific commands on the Haptique® controller's keypad, not just for a single device, but for all sequences and devices. This means you don’t need to open the specified device screen to trigger a command, you can control everything directly from the room screen using a keypad, making your smart home experience seamless and intuitive.
Map Keys
Key mapping is only available when editing a sequence, not during the creation of a new sequence. When editing, a tab labeled “Key Mapping” will be displayed. Tapping on this tab will reveal the Haptique® controller’s keypad layout, where you can assign commands from the list of selected commands in that specific sequence.
To set a command, tap on any key in the keypad layout. This will open the command selection screen. If a command is
already assigned to the selected key, it will display the existing command along with an option to delete it.
Select a new command you wish to bind to the key and tap the Save button to confirm your selection. The new command, along with its associated device name, will now be displayed over the key's position in layout.
Key Points to Remember
The Rooms
Rooms are all about building your own Haptique® controller screens, where you can choose the devices, macros, grid layout, background image, and widgets you want to include.
You can rearrange the positions of devices and sequences within the grid and configure quick action buttons for greater control, elevating your smart home experience to the next level.
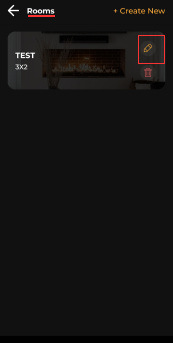
1 | List of Rooms | Shows Room name and grid layout it has. |
2 | Sub menu |
Open option to edit, delete and reset room.
|
3 | Reorder | Change position of room in list, this will reorder in Haptique® controller too. |
4 | Quick access button: Device Pool |
A shortcut button to go directly to the device pool screen.
|
5 | Quick access button : Sequence |
A shortcut button to go directly to the sequence screen.
|
6 | Add Room |
Create a new room.
|
Add Room
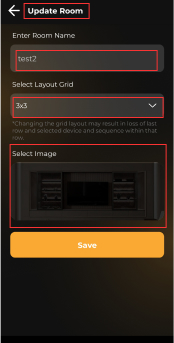
On the Room screen, tap the (+) Add Device button. This will open a form where it will ask for below details:
Room Name: The name of the room, this will be displayed in your Haptique® controller’s main screen.
Layout Grid: This will let you choose a predefined number of rows and column layout you want for the room screen. There are three predefined layout available:
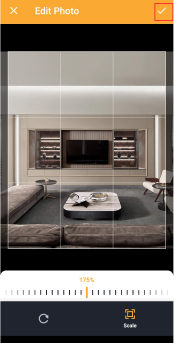
Background Image: Upload your own background image for your room. This will display your Haptique® controller in the list and detail screen.
Edit Room
On the Room screen, tap the three vertical dots to open the submenu, then select Edit from the menu. This will take you to the Edit Room screen, which provides the same configuration options available during the room creation process.
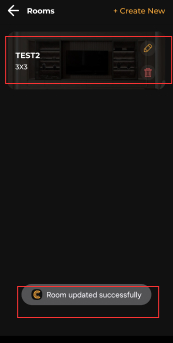
Make any changes you like, and tap the Save button to update the room settings.
Assign Device and Macros
Once a room is created, it’s ready for device and macro assignments. Tap on the room name from the Room List screen to navigate to the grid layout screen.
From the layout screen, tap on any grid space where you want to assign a device or sequence. A prompt will appear asking whether you want to add a device or a sequence. Let’s start by assigning a device.
The Device Pool screen will open. Select the device you want to assign and tap the Save & Continue button to confirm your selection.
After selecting the device, you will be prompted to set a name and icon for the grid tile. You can either leave them as default or customize them. Once you're satisfied, tap the Save Remote button to finalize the selection.
The device is now added to the grid tile. You can reassign it by tapping on the tile again or reorder it by long-pressing the tile and moving it to a new position within the grid.
After assigning devices and sequences, tap the Save button. The room is now ready to be available on your selected Haptique® controller.
Important: To sync the new room and make it available on the Haptique® controller, hit the Refresh button from the Haptique® controller screen.
Quick Access Buttons
This feature allows you to set the most used commands for a device or sequence directly on the room screen. By assigning these commands to specific tiles, you can easily control the device without having to navigate to the device control screen.
To add a quick access button, select the grid tile on which device or sequence is assigned. Then, tap the Quick Access button with the ‘+’ sign. This will open a command list screen for the selected device or sequence. Choose the command you want to assign, and tap Save & Continue to proceed to the next screen.
On the next screen, you’ll be prompted to enter a name for the quick access button and assign an icon for further
customization. You can leave both the name and icon as default if you prefer. Once you're satisfied, tap Save Quick
Button to save your changes and close the screen.
That's it! You now have a quick access button for that particular tile, ready to execute the device command with just
a tap. You can add up to 6 quick access buttons per tile for even greater convenience.
Widgets
Stay up to date with your room's temperature, humidity, and more by adding widgets to the room screen.
To add a widget, tap the Widget button with the ‘+’ icon. This will open the widget selection screen, displaying all available widgets. Choose the widget you want to add to the home screen and tap the Save & Continue button to confirm your selection.
The widget will be added to the room screen and will become available on the Haptique® controller once you hit the
Refresh button from the Haptique® controller screen.
Steps to Reset Haptique Configuration:
- Access Settings Open the Haptique app and navigate to the Settings menu.
- Locate the Reset Option Scroll through the settings menu and look for the option labeled Reset Haptique.
-
Click on Reset Haptique
Select Reset Haptique to initiate the reset process.
- Note: This action will automatically disconnect your account from Haptique.
-
Confirmation (if prompted) If a confirmation message appears, confirm that you want to proceed with resetting Haptique.
- Process Completion After completing the reset, the configuration will return to its default state, and your account will no longer be connected.
Important Information
-
What is Deleted:
- All devices that have been added to your Haptique® system.
- All sequences that have been configured.
- All room data settings.
- Effect of Factory Reset: After performing the reset, your Haptique® system will return to its default state, and you will need to reconfigure everything from scratch.
Steps to Perform a Factory Reset
-
Open the Haptique® Config App
- On your mobile device or computer, launch the Haptique® Config App.
-
Navigate to Settings
- In the app, locate and select the Settings option from the main menu.
-
Select 'Factory Reset'
- Scroll down until you find the Factory Reset option.
- Tap or click on Factory Reset.
-
Confirm the Reset
- A confirmation prompt will appear to ensure you want to proceed with the reset.
- Confirm the action by selecting Yes, Reset or the equivalent option.
-
Wait for the Reset to Complete
- The app will begin the reset process. It may take a few moments for the system to delete all data and return to its factory default settings.
-
Reconfigure Your Haptique® System
- Once the reset is complete, your Haptique® system will be in its initial state. You will need to add devices, create sequences, and set up rooms again.
Things to Remember Before Resetting
Reconfiguration: After the reset, you’ll need to manually re-add your devices and reconfigure your settings in the app.
Need Help?
If you encounter any issues or have questions about the reset process, please contact our support for assistance.