


OPUS 1
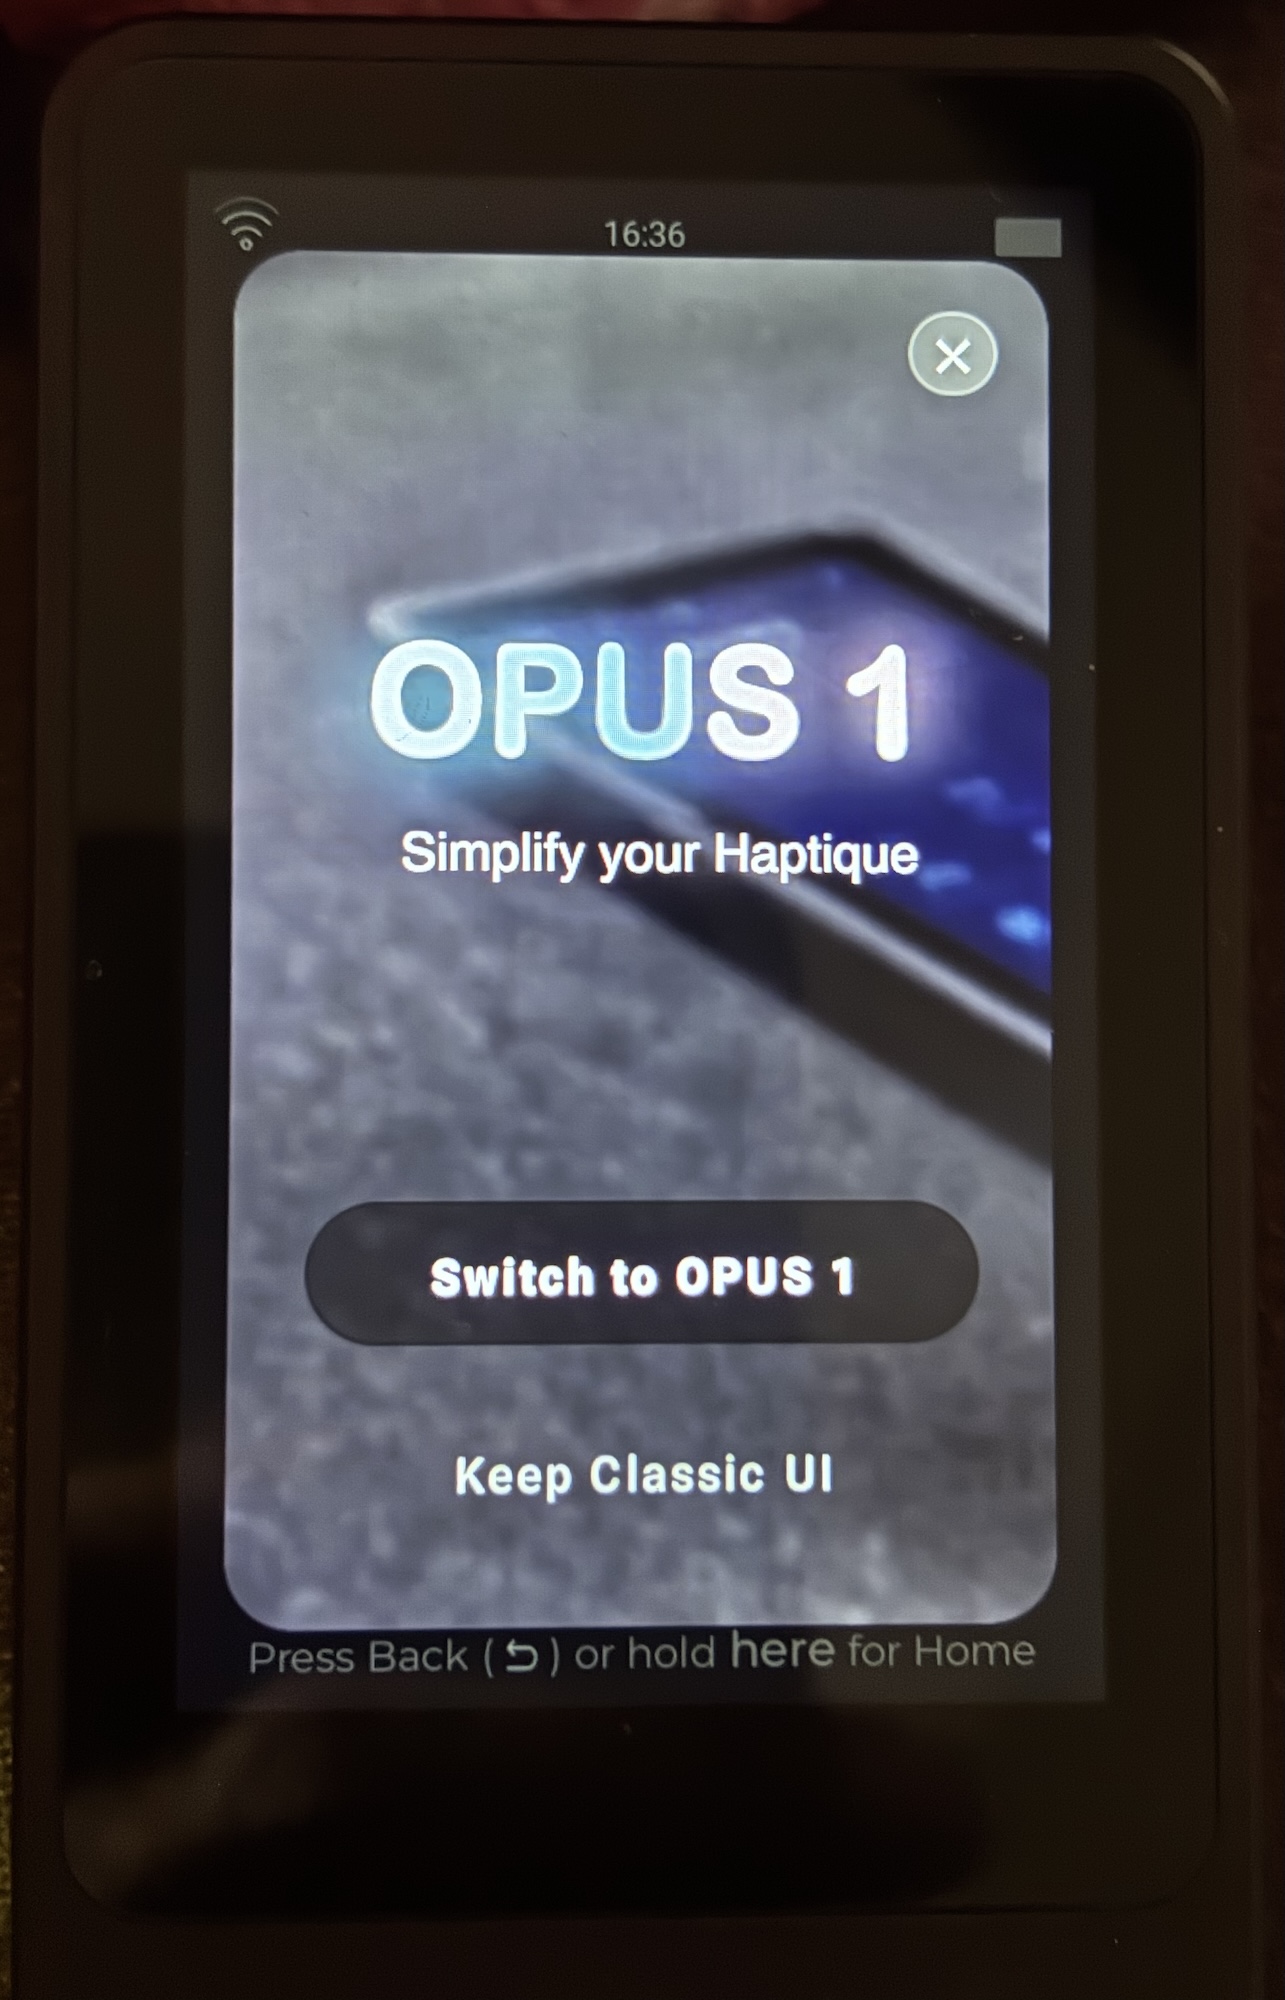
OPUS 1 is a new, refreshed way to interact with your Haptique remote controller. It’s currently available as an optional UI you can enable from Settings.
Press the Sync button to fetch the latest update. After the update, you’ll see an option to switch to OPUS 1.
What’s new in OPUS 1?
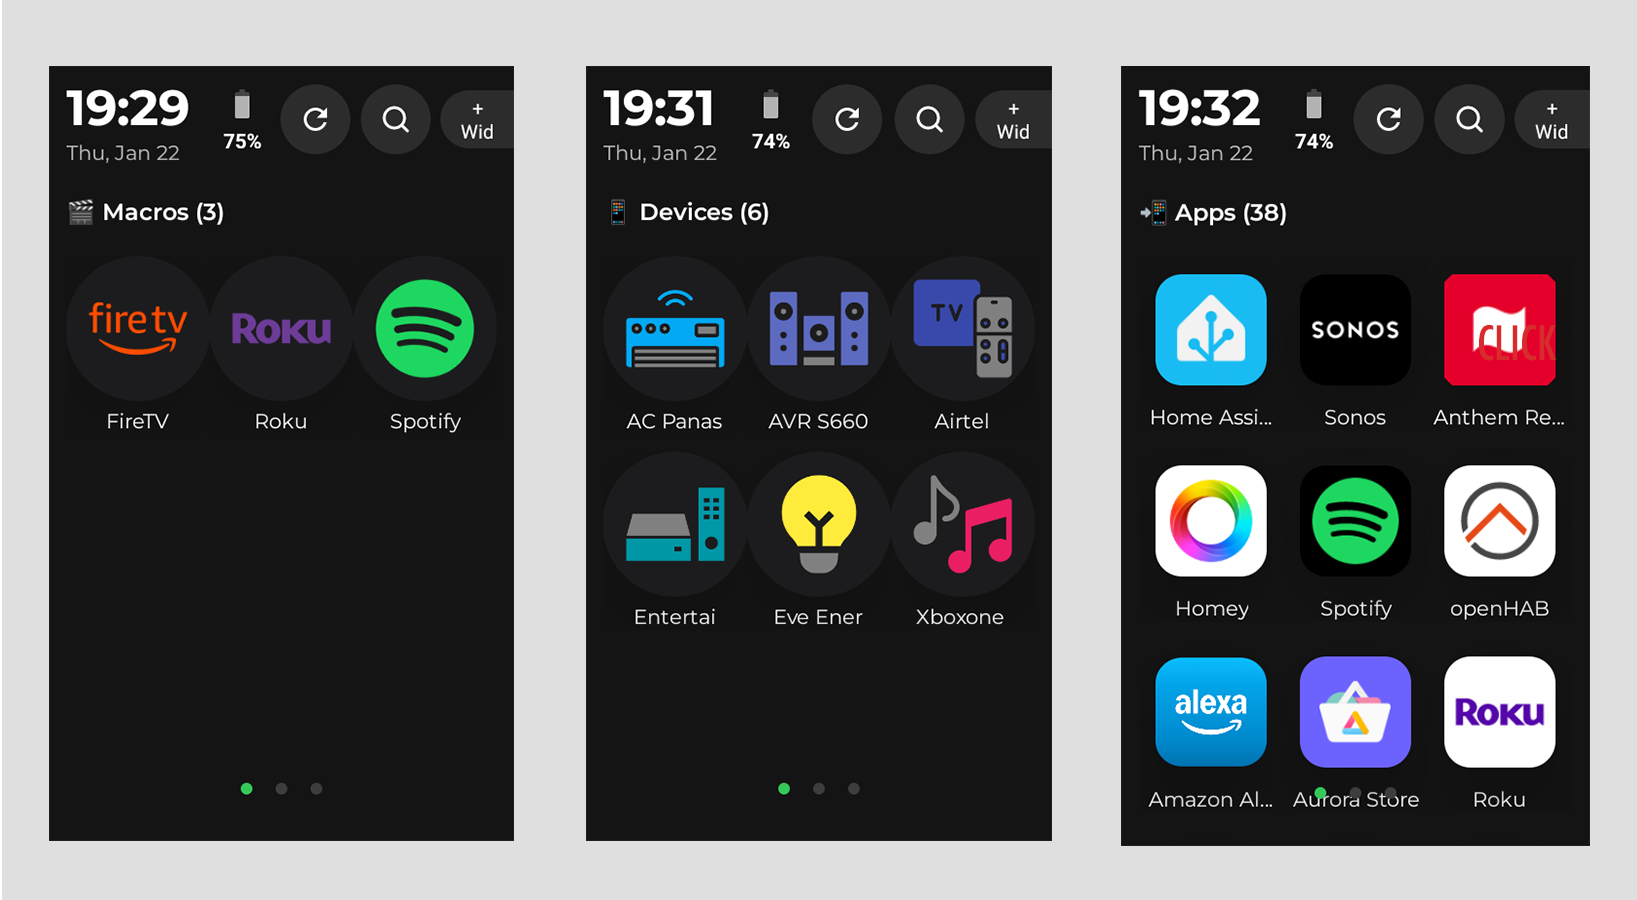
- No Rooms — OPUS 1 is simplified into three pages: Macros, Devices, and Apps.
- Apps = Android native apps installed on Haptique.
- No long-press — everything is designed for a simple single tap, similar to how smartphones work.
Every element in OPUS 1 uses a single click/tap, and actions follow immediately.
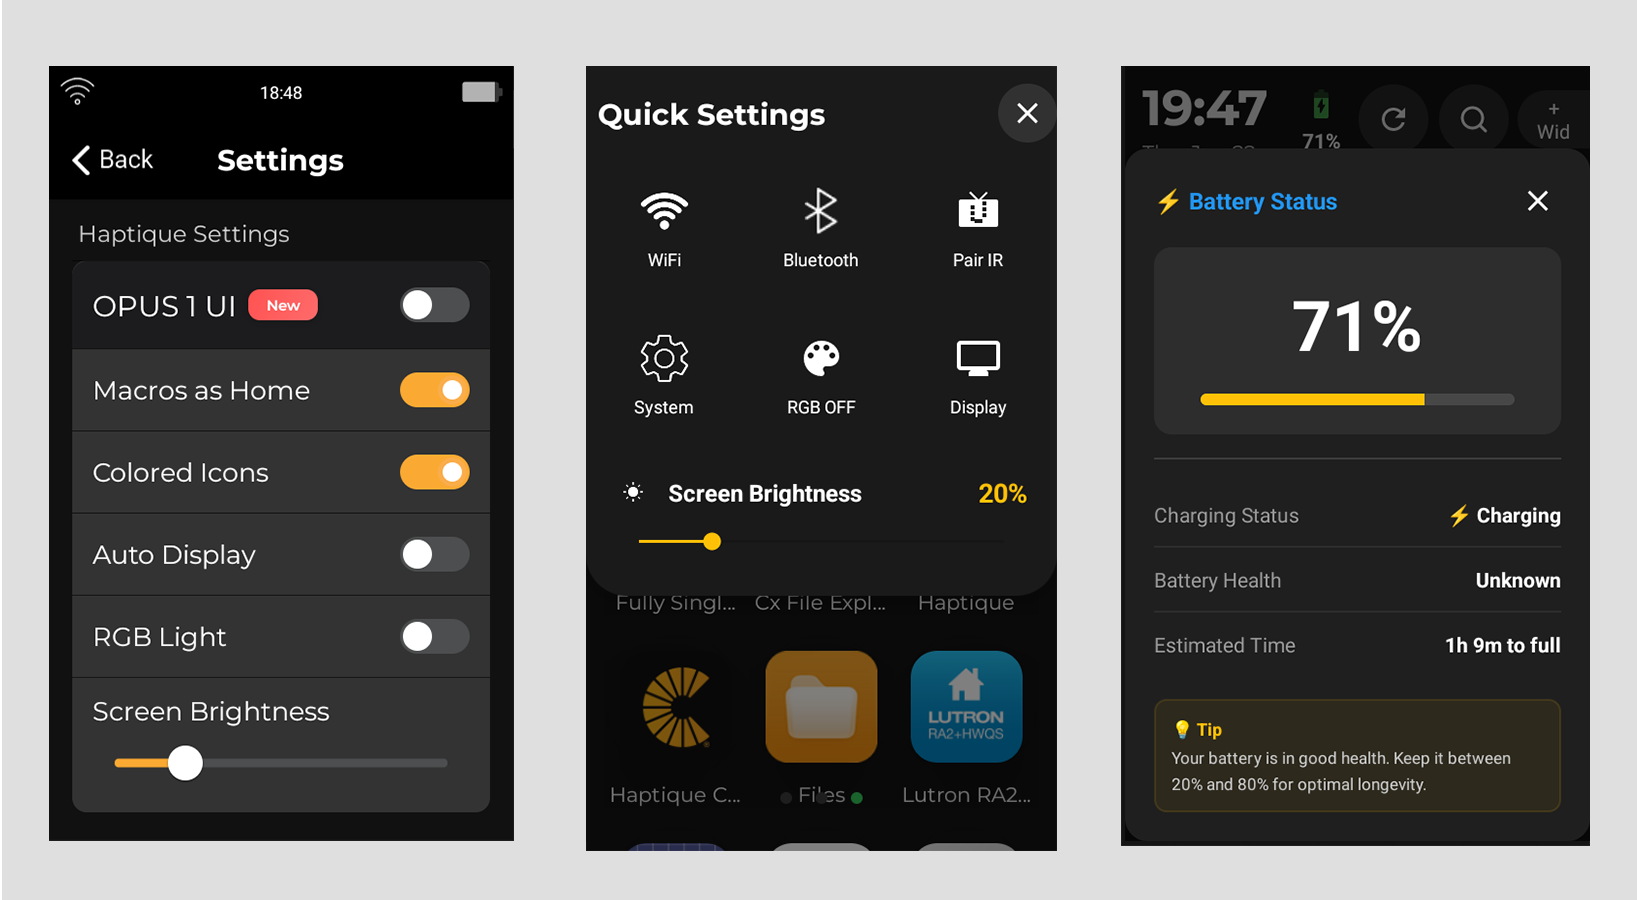
New Settings
Access settings from swipe down on the touchscreen just like smartphone.
Switching back to the standard RS90 UI
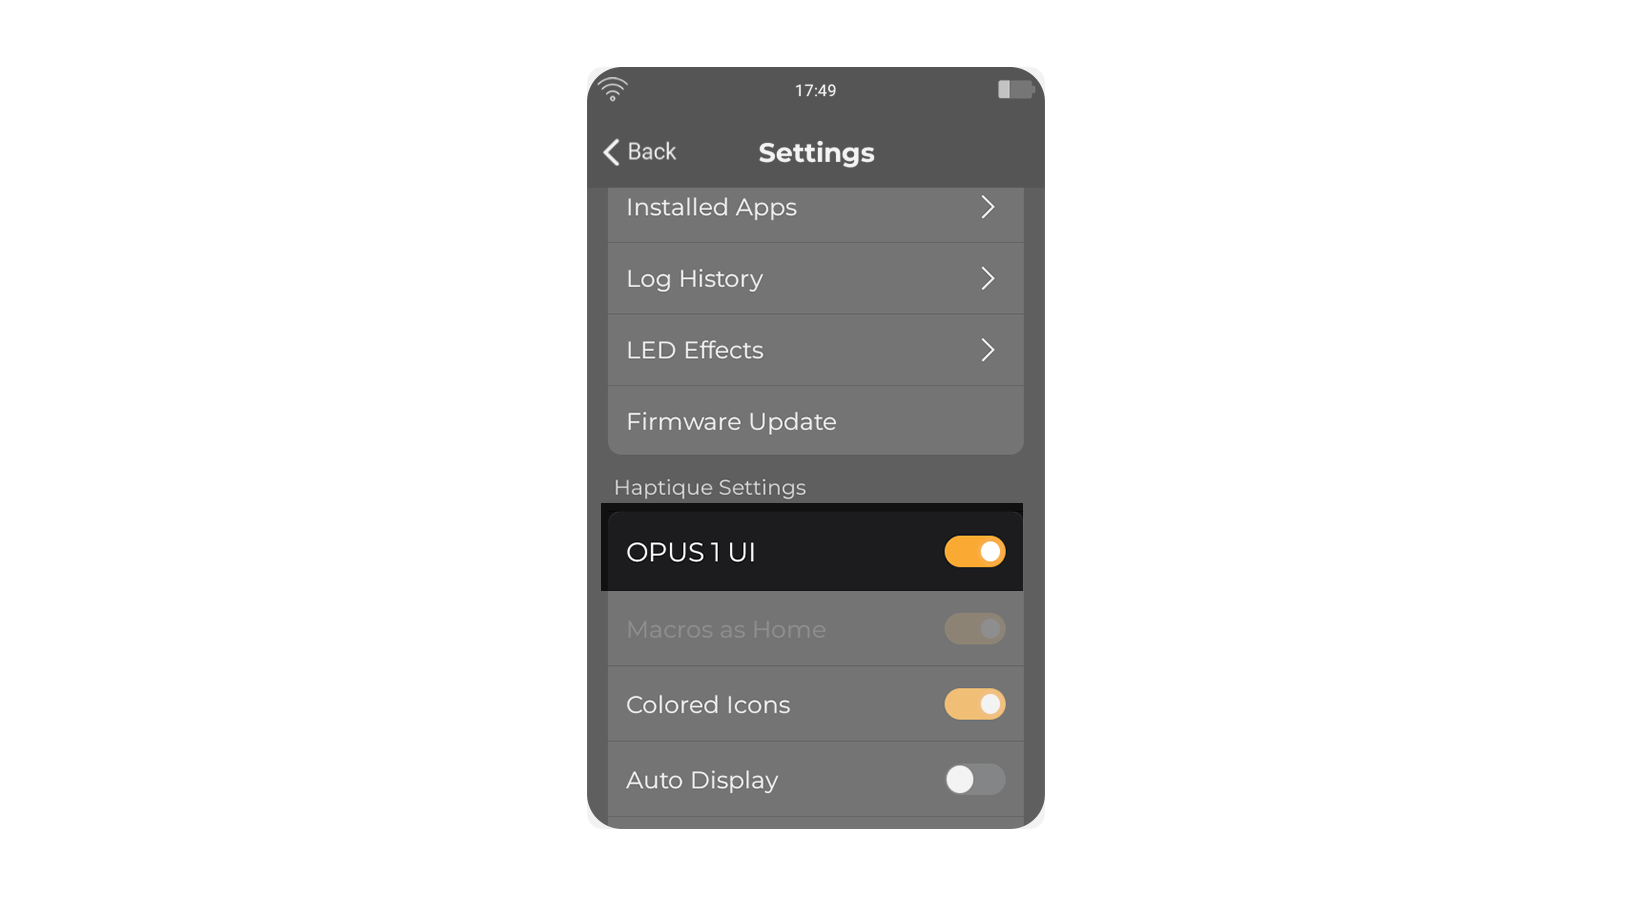
You can revert to the standard RS90 UI anytime by disabling OPUS 1 in Settings. The app currently supports both UI versions.
Favorites in OPUS 1
Just like Sequence → Macros, you can also mark Devices (from Rooms or the Device Pool) as Favorites. In OPUS 1, only your Favorites will be shown for faster access.
Macros
The Macros page shows all the automation sequences you have marked as Favourites in the Haptique config app. This keeps your remote focused on only the sequences you use every day.
The RS90 is a hardware remote — it runs your automations but does not create them. Automations are built in the separate Haptique config app on your phone or browser. Think of the config app as your setup tool and the RS90 as the executor. You design your automations once in the app, then run them instantly from the hardware. This is why the steps below start in the config app before moving to the RS90.
Note: In the config app these automations are called Sequences. On the RS90 they appear as Macros — they are the same thing.
Macros must be marked as Favourites in the config app first, then synced to the RS90. Follow the two steps below to get your Macros appearing.
Step 1 — Mark a Sequence as Favourite in the Config App
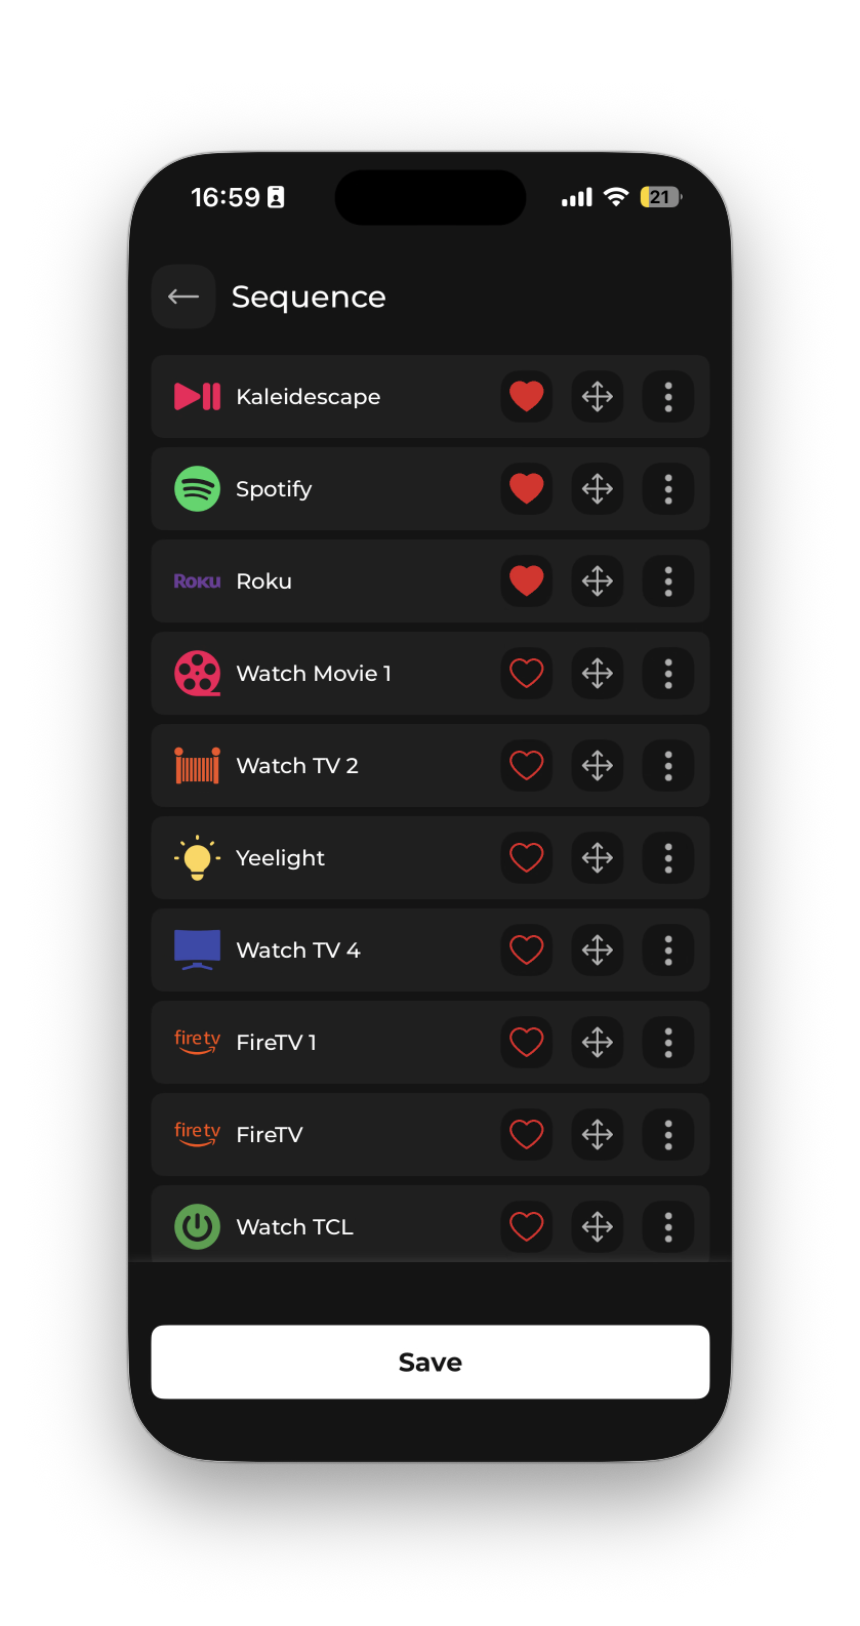
Open the Haptique config app on your phone or browser and go to Sequences.
- Find the Sequence you want to appear on the Macros screen.
- Tap the ★ Favourite (star) icon on that Sequence tile or inside its detail page.
- The star fills to confirm it is now marked as a Favourite.
- Repeat for any other Sequences you want on the remote.
Step 2 — Sync the RS90
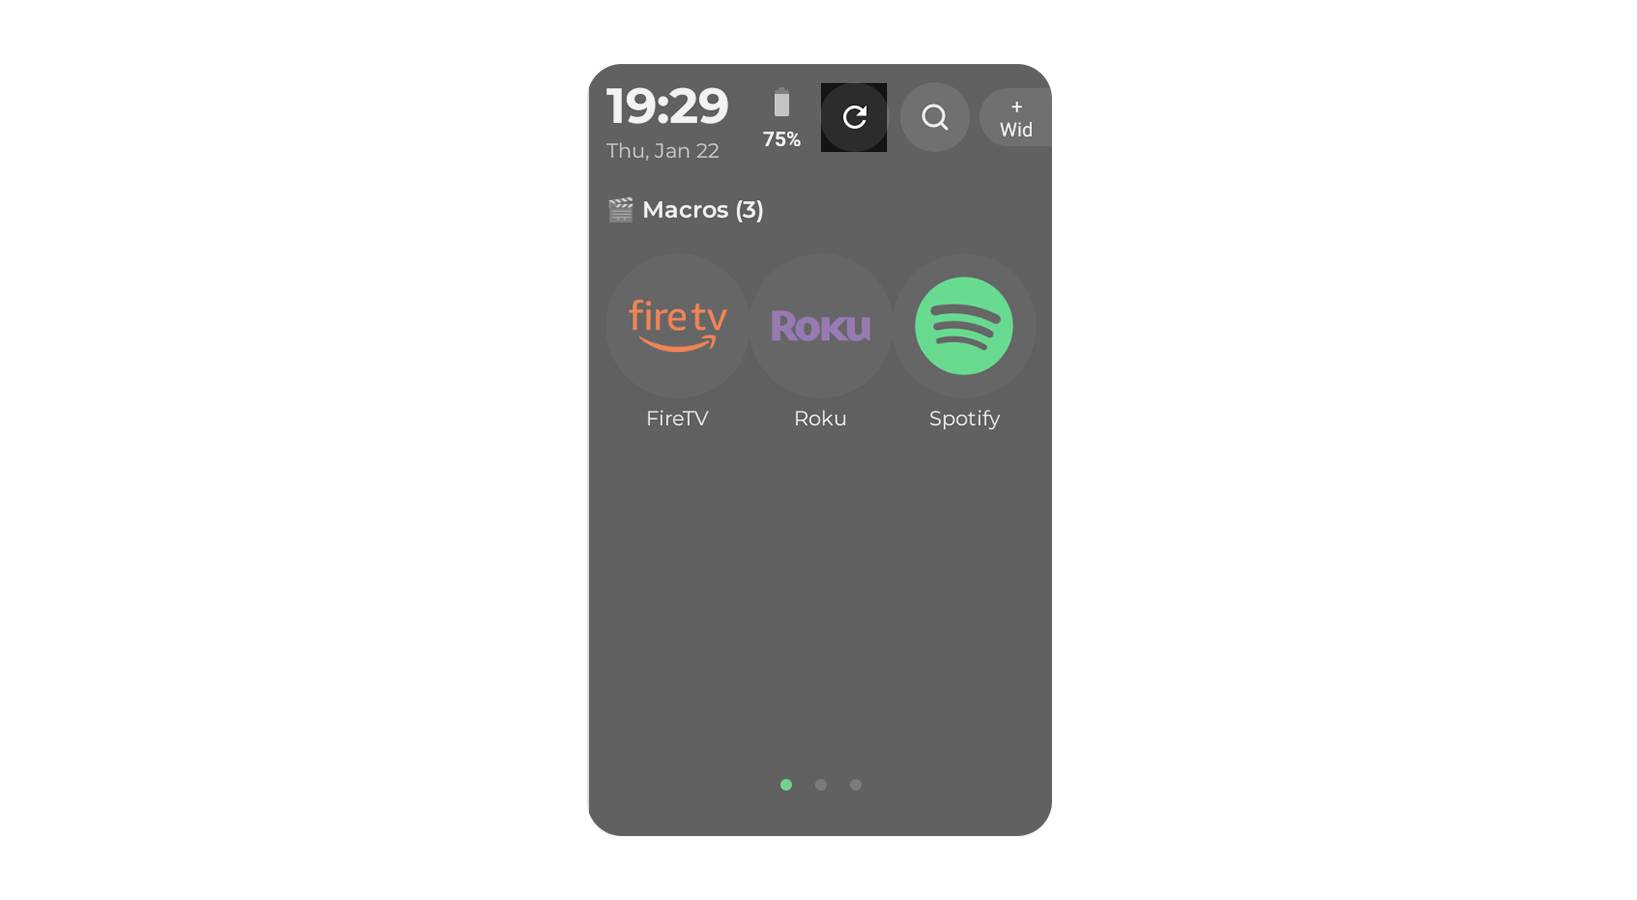
Once favourites are saved in the config app, sync the RS90 so it pulls the latest data from the server.
- First time or after making changes in the config app — Go to Settings on the RS90 and tap Sync. This fetches all your latest sequences, devices, and rooms from the server.
- Already on the Macros screen — Tap the refresh icon (↻) in the top-right corner to reload the list quickly without going into Settings.
Your Favourited Sequences appear on the Macros screen immediately. The list always shows only Favourites — non-favourite sequences are still stored on the device but are accessed via the full Sequence Pool.
Running a Macro (Execute)

In OPUS 1, tap a Macro tile once. A bottom sheet slides up showing the Macro name, icon, and three action buttons:
- Execute — runs the ON sequence (sends all power-on and setup commands to your devices in order)
- Control Page — opens the Macro screen directly without running the sequence (available when the Macro is already in the ON state)
- Key Lock — locks the physical remote buttons to this Macro
- Tap the Macro tile on the Macros screen.
- The options bottom sheet appears showing the Macro name and its current state — whether it is ready to turn devices ON or ready to turn devices OFF.
- Tap Execute to run the ON sequence. Haptique sends every command in the sequence to your devices in the configured order — a circular progress indicator fills as each step completes, showing the device name and command being sent.
- Once all commands have been sent, the progress completes and you land on the Macro control screen where you can interact with each device page.
If the Macro has already been executed and devices are on, the bottom sheet shows Control Page instead of Execute. Tap it to jump straight to the Macro control screen without re-running the ON sequence.
Powering Off a Macro (OFF Sequence)
Once a Macro has been executed and your devices are on, a red Power Off button appears at the top of the Macro control screen. Tapping it runs the OFF sequence and powers down all devices in that Macro.
- After running a Macro, you are on the Macro control screen. The red power button is visible at the top of the screen.
- Tap the red Power Off button.
- A confirmation prompt appears: “Power off all devices?”. Tap Confirm to proceed.
- Haptique runs every command in the OFF sequence in order, turning off all devices configured in that Macro.
Once the OFF sequence finishes you are returned to the Macros screen, ready to run another Macro or close the app. Your devices are now powered off in the same order they were configured in the Sequence.
Macro Screen
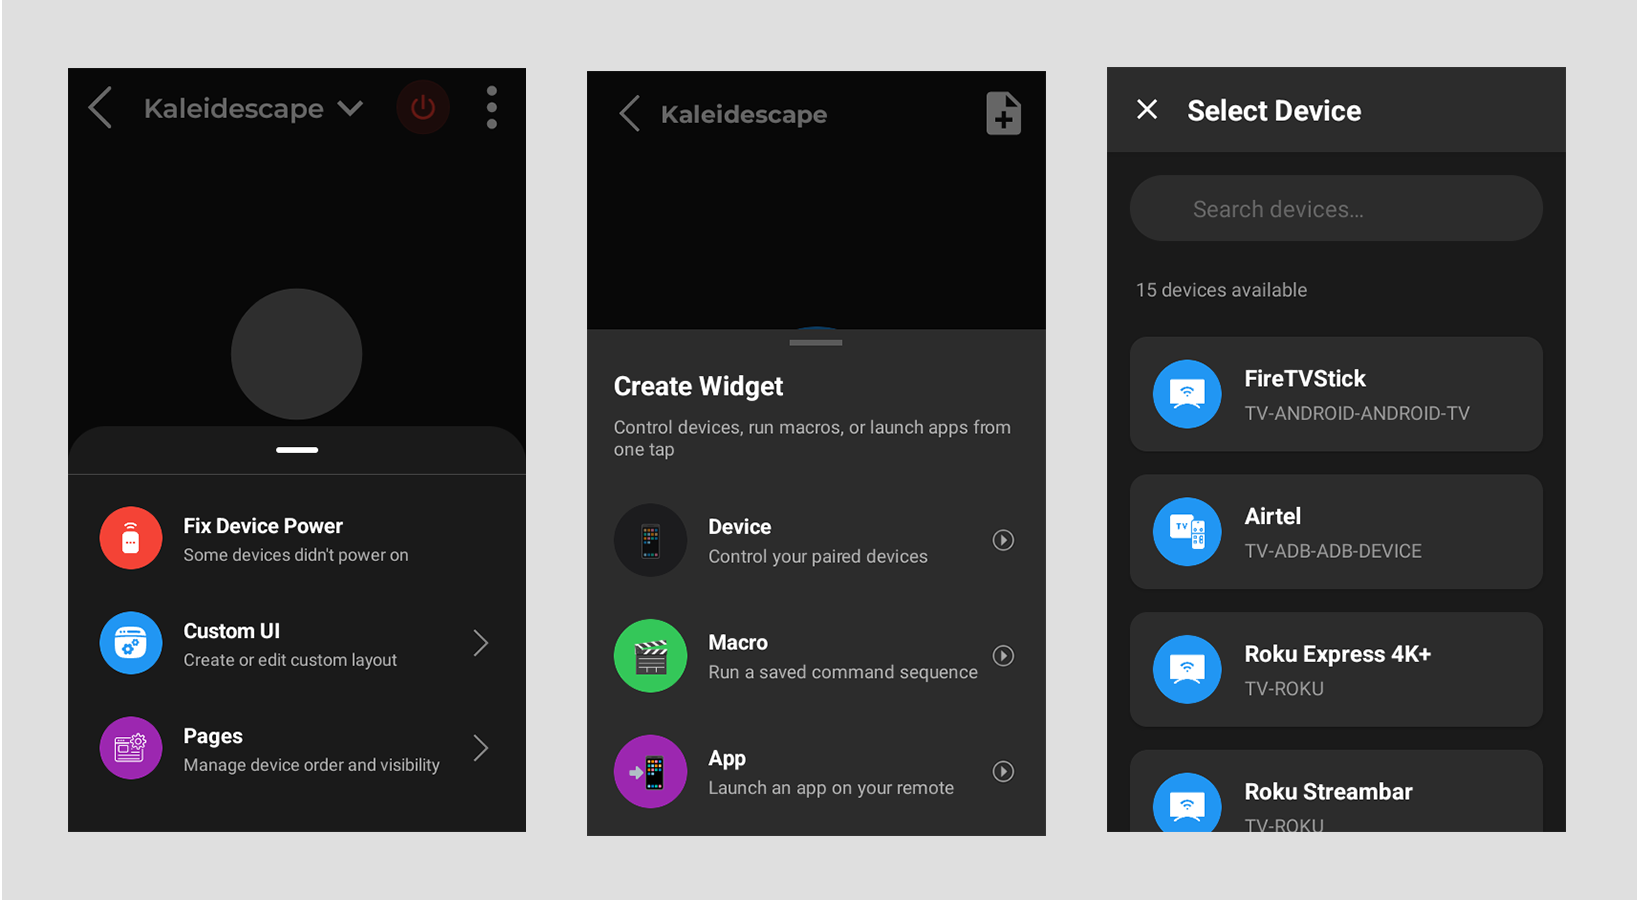
When you tap a Macro in OPUS 1, you enter the Macro screen — a paged controller that organises every device in the Macro into its own swipeable page. Tap the Macro name / title bar at the top to open the full page list and jump directly to any device page. Use the ⋮ options menu (top-right) to access Custom UI setup, Pages management, Fix, and the OFF sequence.
1. How to Add an Android App to Custom UI
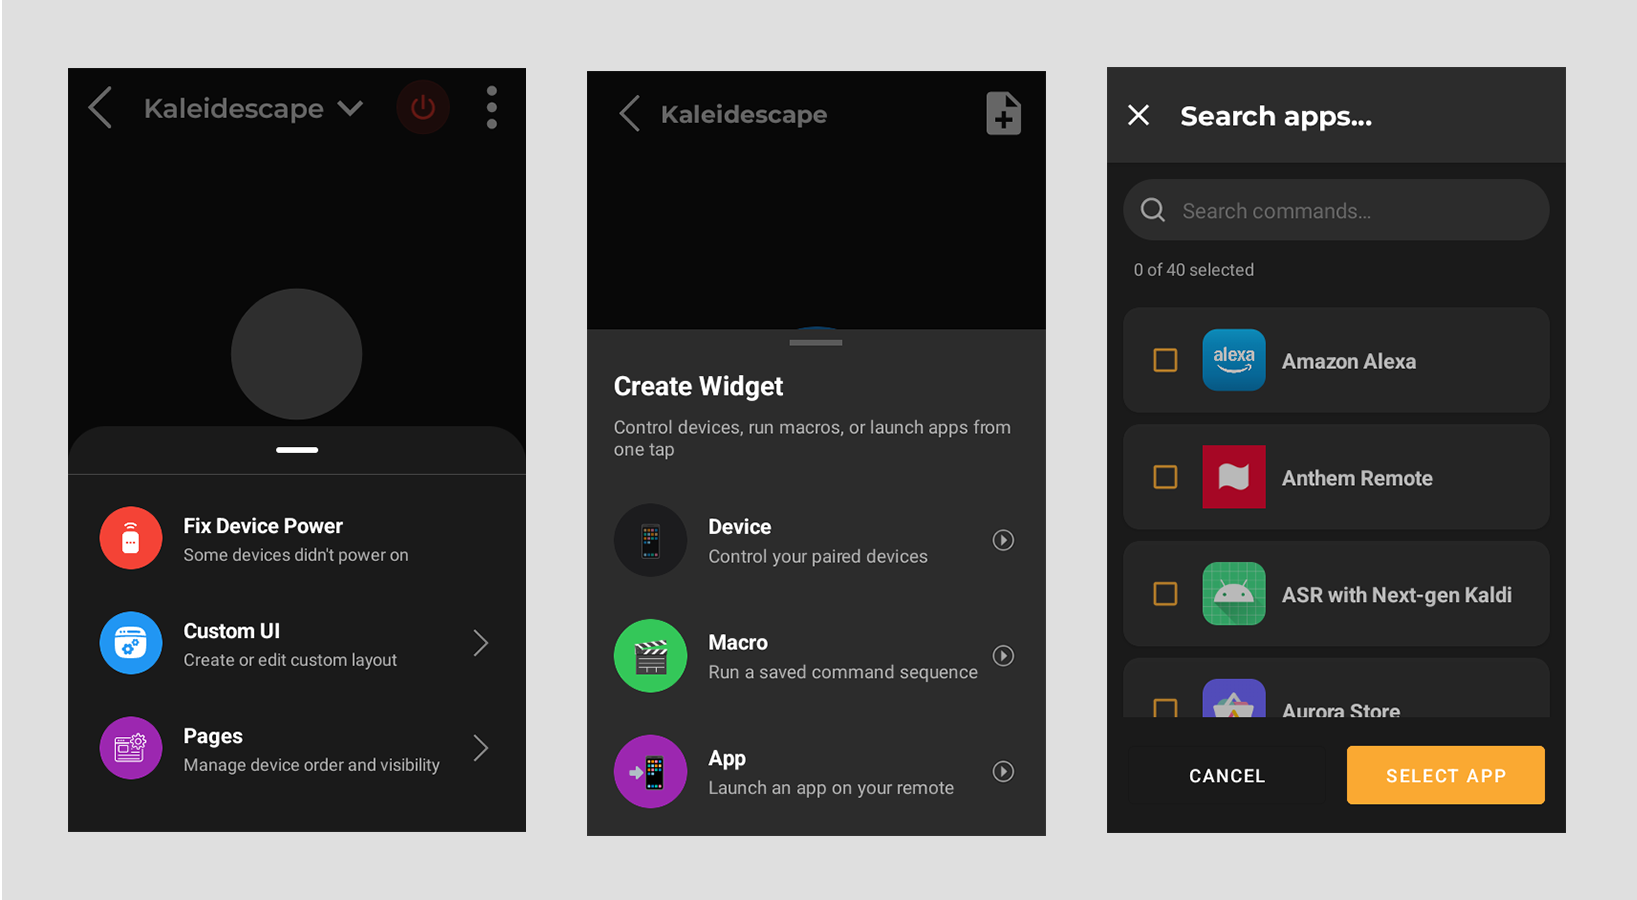
You can pin Android apps installed on Haptique directly inside a Macro's Custom UI so they are one tap away without leaving the Macro.
- On the Macro screen, open ⋮ → Custom UI.
- Tap + Add Component.
- Choose Install App from the component type picker.
- A multi-select list of apps installed on the device appears. Select the apps you want to include, then tap Done.
- The apps appear as a widget on your Custom UI. Tapping any app icon launches it instantly.
- Tap Save to keep the layout.
Tap the edit icon on the widget card in the setup screen to open the multi-select picker again and change which apps are included.
2. How to Add a Command as a UI Element in Custom UI
Individual device commands — like Volume, Mute, Navigation, Media controls, and more — can be added as interactive buttons directly on your Custom UI layout.
- Open ⋮ → Custom UI from the Macro screen.
- Tap + Add Component and choose Device Widget.
- Select the device you want to control from the device list.
- Choose a command category — available categories depend on what the device supports:
- Power Controls — Power On/Off
- Volume Controls — Volume Up/Down
- Mute Control — Mute toggle
- Input / Source — Input source selection
- Navigation Pad — D-pad (▲ ▼ ◀ ▶ + OK)
- Media Controls — Play, Pause, Forward, Rewind
- Channel Controls — Channel Up/Down
- Brightness Controls — Brightness Up/Down
- Color Temperature Controls — Temperature Up/Down
- Extra Commands — Pick individual commands (Home, Back, Menu, and other device-specific buttons) from a multi-select list
- The widget is added to your layout as a group of command buttons.
On the live Custom UI (not the setup screen), each Extra Commands button shows a small edit icon. Tap it to rename the button label. The change saves automatically and syncs to the server.
In the Extra Commands and Sequences widgets, press and hold any command button to drag it to a new position within that widget. Release to drop. The new order is saved automatically.
3. How to Add a Widget in Custom UI
Widgets are grouped control blocks you can arrange freely in your Custom UI layout. There are three widget types:
- Device Widget — A set of command buttons for a specific device category (see section 2 above). Multiple device widgets can be added — for example, a Volume widget for your TV and a separate Power widget for your AVR.
- Sequence Widget — Embeds one or more of your saved Sequences as buttons inside the layout. Select multiple sequences from the picker; they appear as a scrollable vertical list. Tap any sequence name to run it immediately. Long-press to drag and reorder sequences within the widget.
- Text Label — A custom heading or visual divider you can insert between widgets. Tap the T icon on the setup toolbar to add one. Options include text content, font size, style (Normal / Bold / Italic / Bold Italic), and alignment (Left / Center / Right). Bold labels automatically display a divider line beneath them. Long-press a Text Label on the live Custom UI to edit it inline.
In the Custom UI setup screen, press and hold any widget card to drag it up or down the list and rearrange your layout. Tap the delete icon to remove a widget (a confirmation prompt appears before deletion). Tap the edit icon to change which commands or sequences it contains.
4. How to Add, Remove, and Reorder Pages in a Macro
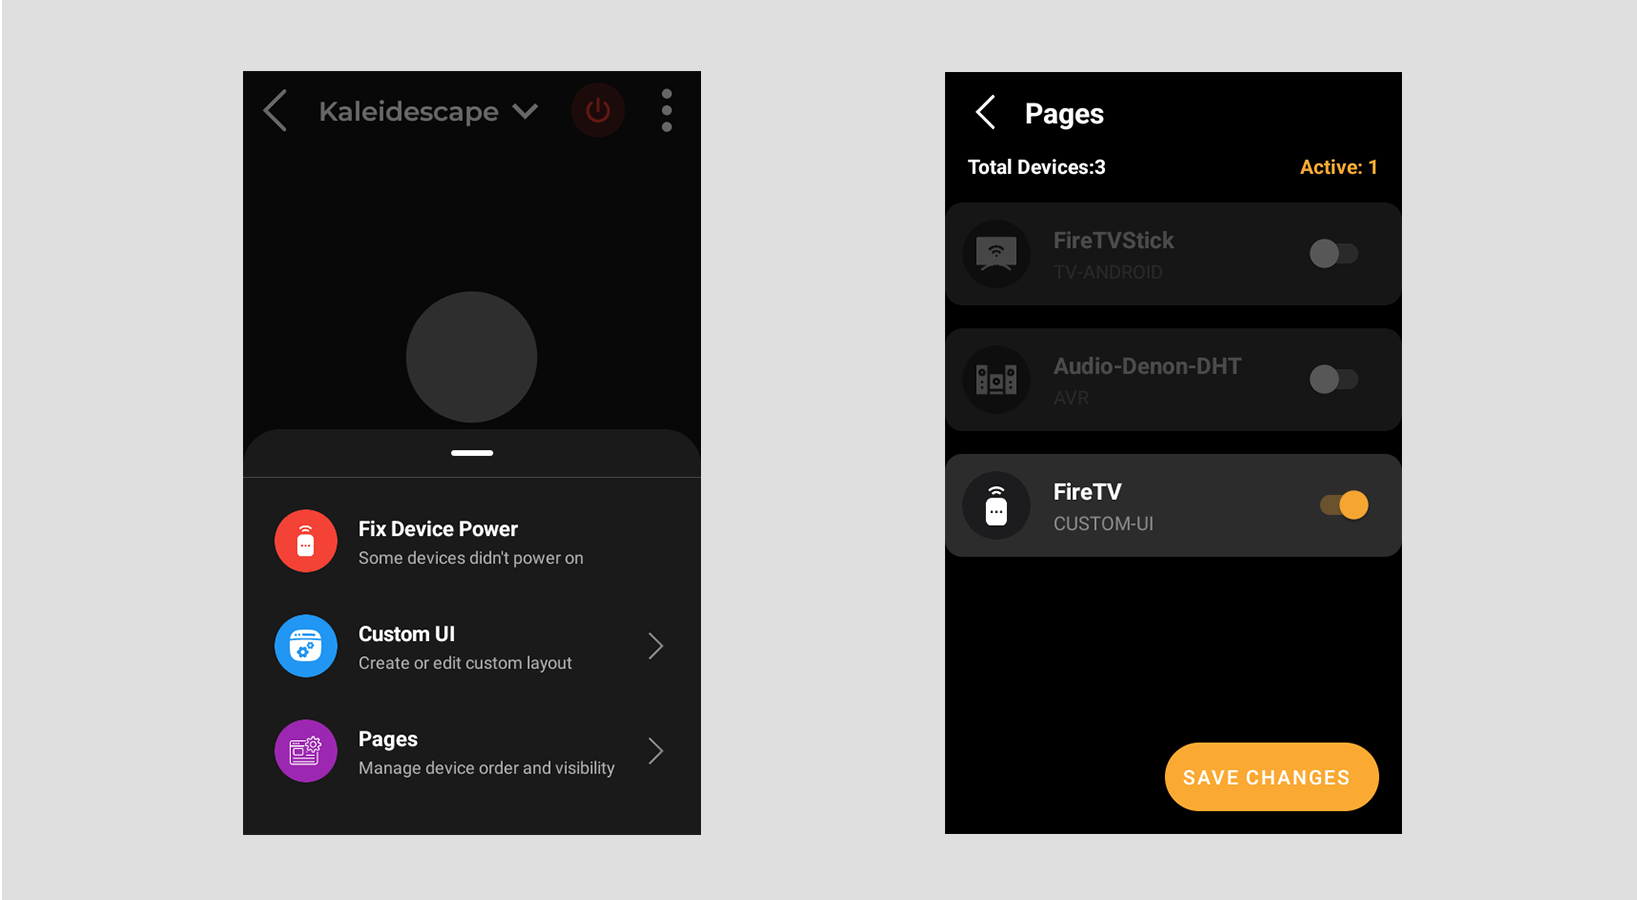
Each device in a Macro has its own control page. The Pages screen lets you choose which pages are visible and in what order they appear when you swipe through the Macro.
- On the Macro screen, tap ⋮ → Pages.
- You will see a list of all devices associated with this Macro, including the Custom UI page.
- Enable or disable a page — use the toggle next to each device to show or hide that page in the Macro. Disabled pages are dimmed and will not appear when you swipe through the Macro.
- Reorder pages — drag a device row up or down using the drag handle to change its position in the swipe sequence.
- Tap the Save button to apply your changes. The Macro immediately reloads with the updated page order and only the active pages visible.
Your page configuration is saved per Macro. If you later add a new device to the Macro in the configurator, it will appear as a new active page appended to the end of your existing order.
5. How to Use the Fix Feature if Your IR Device Did Not Turn On
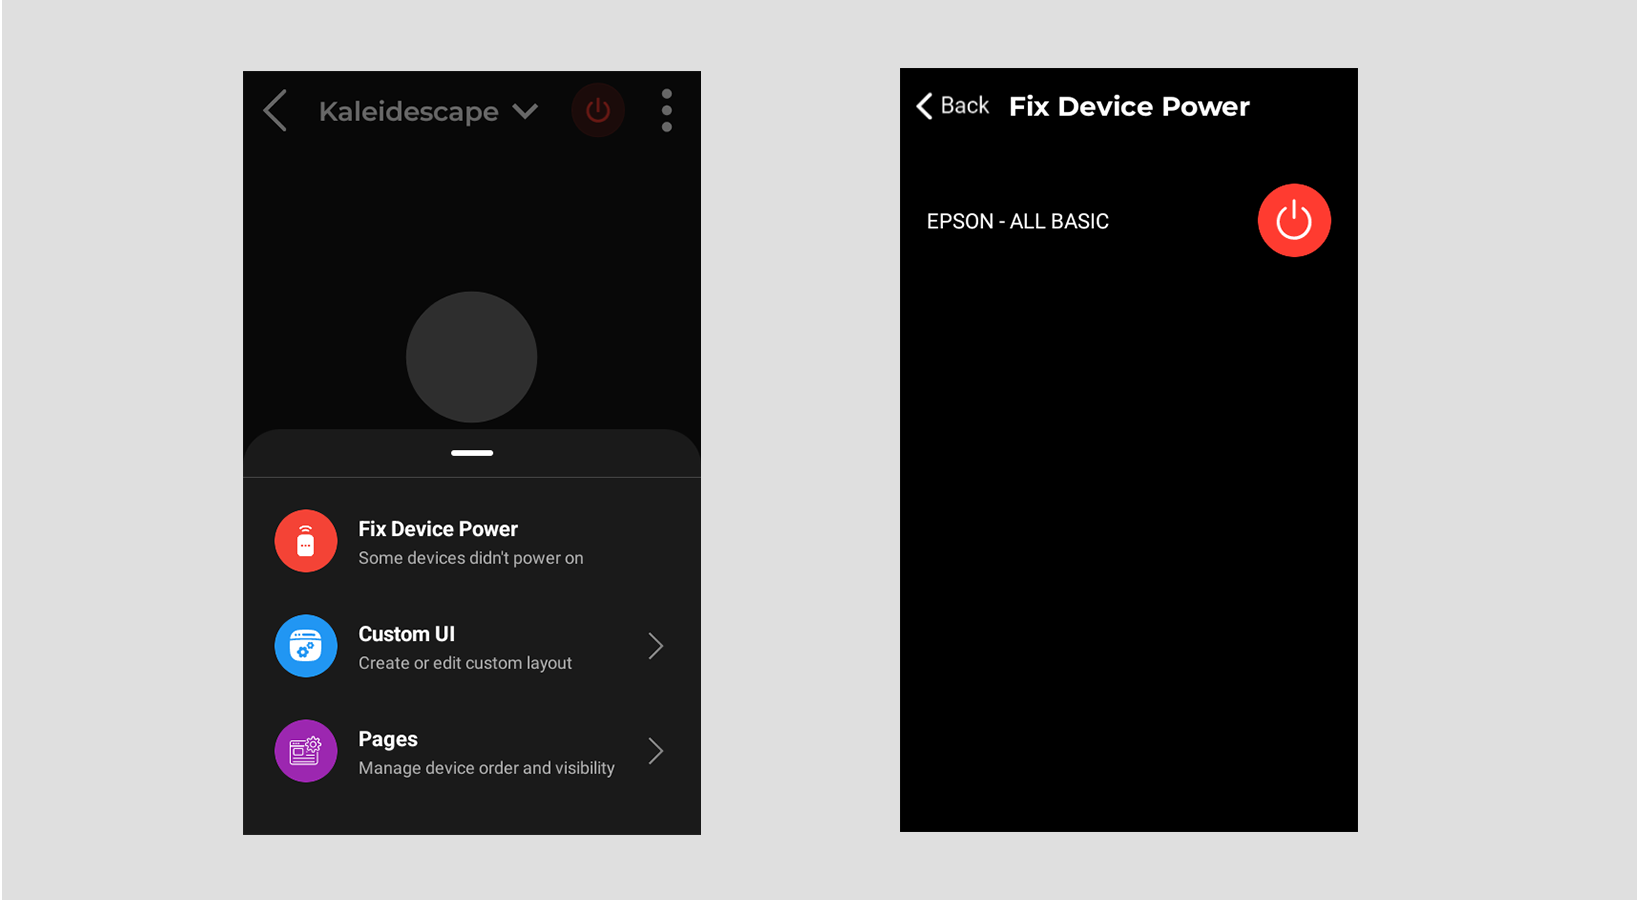
If an IR device in the Macro failed to power on when the Macro ran, the Fix option lets you manually send the Power On command to that device and confirm whether it responded — without re-running the entire Macro.
- On the Macro screen, tap ⋮ → Fix.
This option only appears when the Macro contains at least one IR device. - A list of all IR devices in the Macro is shown. Each device has a Power button next to it.
- Tap Power next to the device that did not turn on. Haptique sends the IR Power On command to that device immediately via the connected IR blaster.
- A confirmation prompt appears asking “Did your [Device Name] power on?”
- Tap Yes — the device is marked as powered on and the status is saved.
- Tap No — the prompt closes. Check that the IR blaster has a clear line of sight to the device and try again.
The Fix feature works only for devices controlled via IR. Make sure your IR blaster is connected and positioned with a clear line of sight to the device's IR receiver. If the Power command is not in the device's database, the Fix screen will show an empty list.
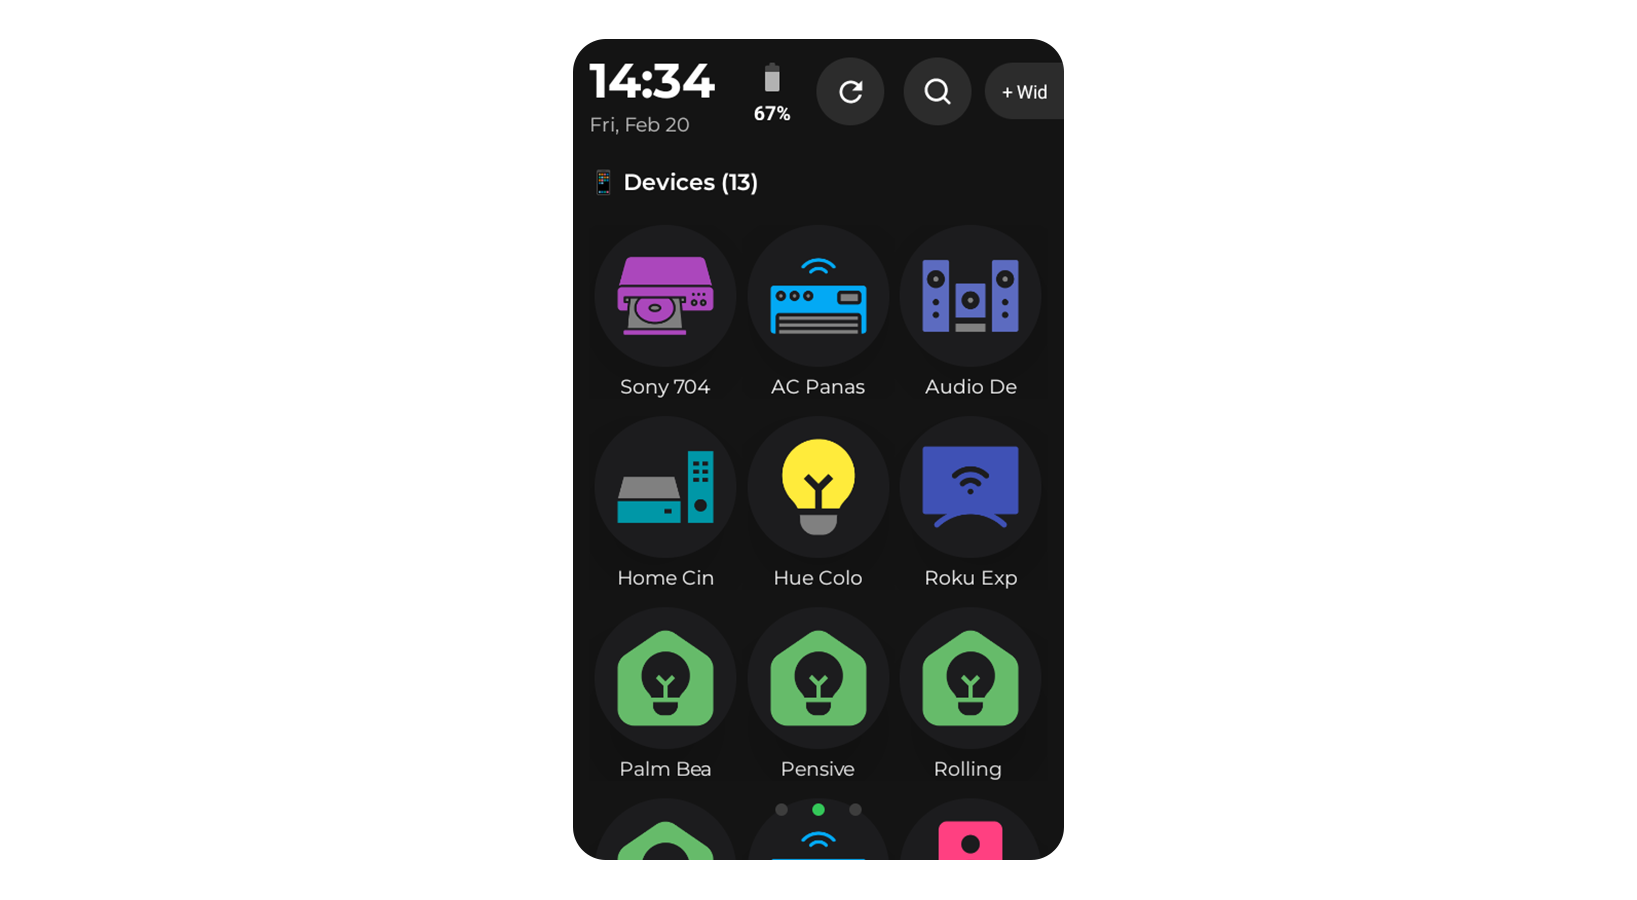
Devices
The Devices page in OPUS 1 shows every Haptique device paired to your RS90. Each device appears as a tile displaying its name and icon. Tapping a tile opens the device control screen for that device directly — no extra steps.
Devices are set up and paired in the Haptique config app on your phone or browser. Once paired and synced to the RS90, they appear automatically on the Devices page. You do not add or configure devices from the RS90 itself.
Make sure you have paired at least one device in the Haptique config app and then synced the RS90 via Settings → Sync.
Opening a Device Control Screen
- Go to the Devices page on the RS90.
- Tap the tile for the device you want to control.
- The device control screen opens immediately, showing all the controls available for that device — buttons, sliders, navigation pads, or whatever is applicable to its device type.
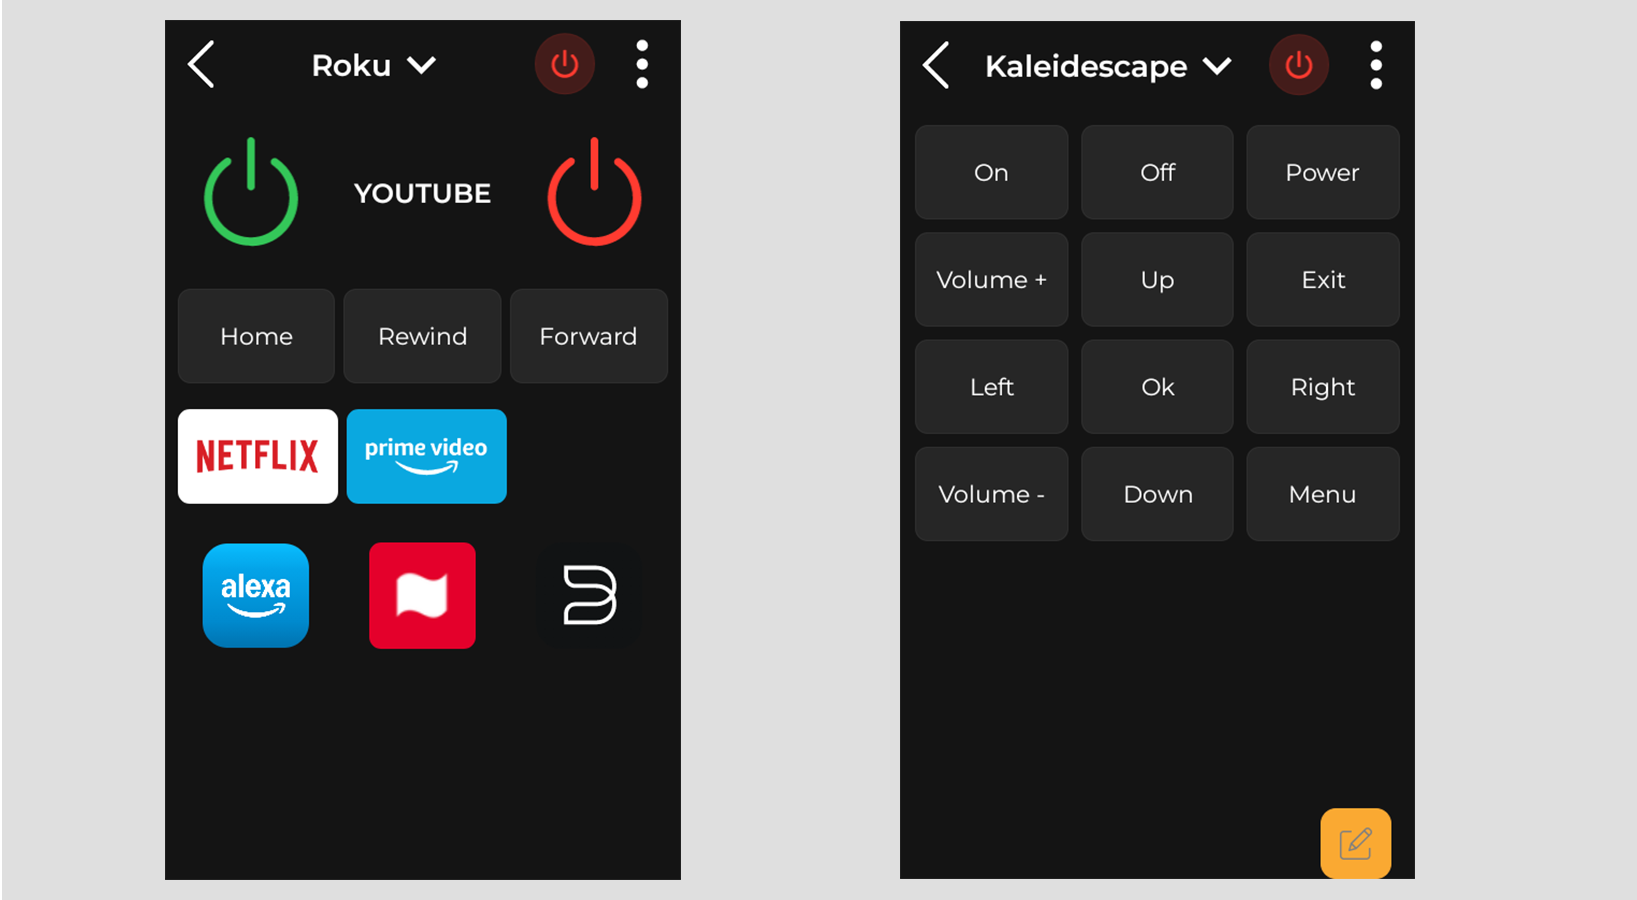
Device Control Screen
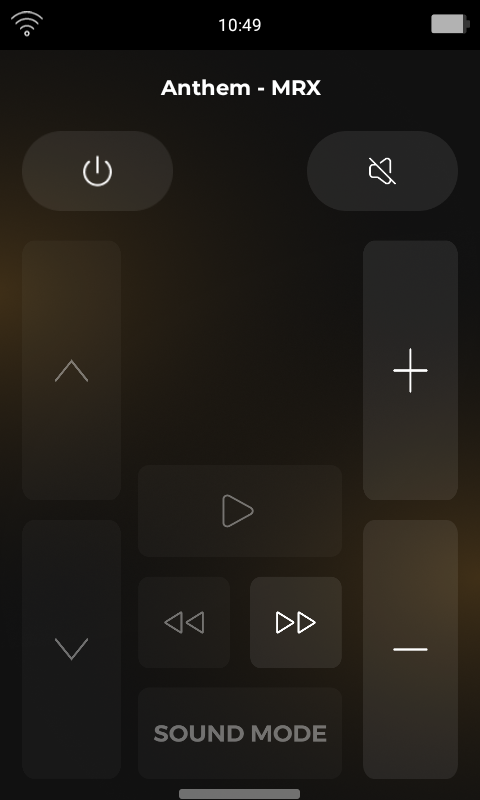
The device control screen is tailored to each device type. Depending on the device, you may see controls such as:
- Power — turn the device on or off
- Volume & Mute — adjust or silence audio output
- Input / Source — switch between input channels
- Navigation Pad — directional controls and select button
- Media Controls — play, pause, skip, rewind
- Channel — channel up/down and number entry
- Brightness & Colour Temperature — for supported lighting devices
- Extra Commands — any additional commands configured for that device
An IR TV will show different controls to a Sonos speaker or a smart light. The RS90 automatically loads the right control layout for each device based on how it was configured in the config app.
Tap the back button or swipe back to return to the Devices page at any time.

